Overview
This administration guide describes the steps to perform as a system administrator to set up and run Requirements Valuation Cockpit (RVC) by CENIT.
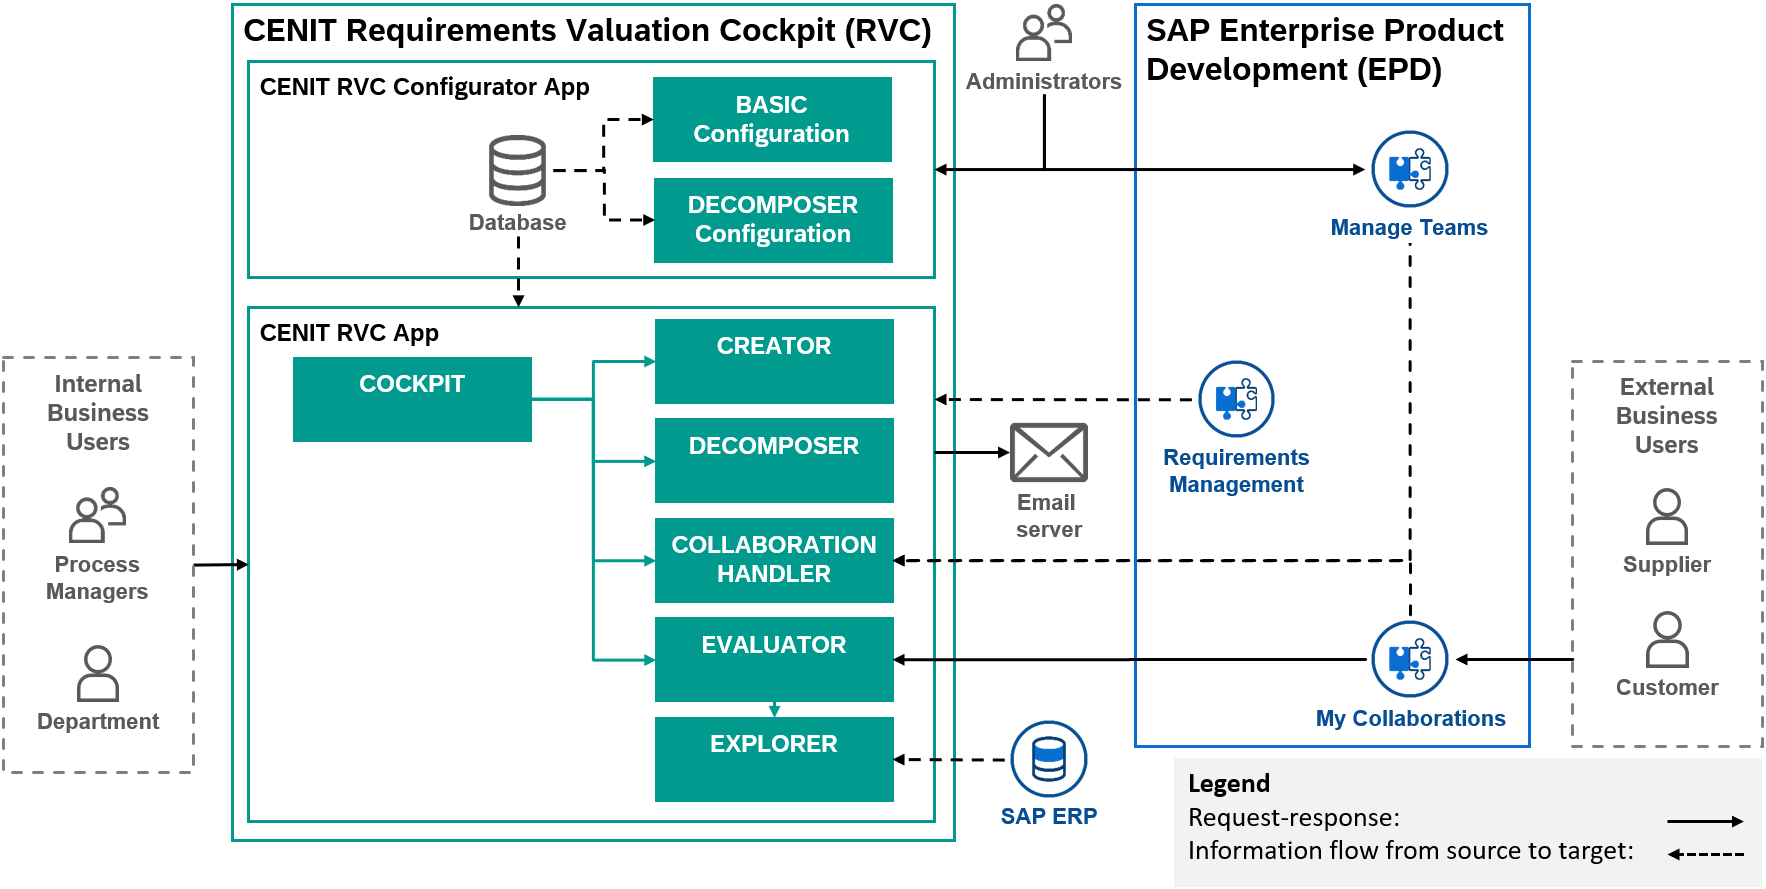
About Requirements Valuation Cockpit (RVC) by CENIT
RVC helps to shorten time-to-quote in Request for Information, Proposal or Quote (RFx) processes by providing a central interface for managing and processing customer requirements in order to offer a high-quality solution for the customer in the shortest possible time.
The following diagram shows the solution concept:
1. Technical Prerequisites
This section lists the technical prerequisites for RVC. As RVC builds on SAP EPD, the technical prerequisites for SAP EPD apply.
RVC requires the following services subscribed and configured in customers Sub Account on CENIT’s SAP BTP Global Account:
RVC requires the following services subscribed and configured in customers SAP BTP cockpit:
-
SAP Enterprise Product Development (EPD), especially:
-
Invitation Mails to First-Time Users are configured for Collaboration capability of SAP EPD
-
Notification Mails to Registered Users are configured for Collaboration capability of SAP EPD
-
OAuth 2.0 Client Credentials Flow is configured for Requirement Management capability of SAP EPD
-
Concurrent Editing is enabled for Requirement Management capability of SAP EPD
-
RVC requires the following components ready to be used:
-
Email server with the following characteristics:
-
It supports the SMTP STARTTLS command on ports 587 or 465.
-
It requires authentication.
-
In addition RVC requires pre configuration in the capabilities of SAP EPD which are described in the following sub sections.
1.1. Pre configuration for Requirement Management capability of SAP EPD
RVC manages RFx processes which are created with RVC Creator functionality. RFx processes are technically requirements models of Requirement Management capability of SAP EPD. RFx processes include the requirements management extension of RVC. To create a new RFx process RVC Creator uses a specific requirements model template which contains the requirements management extension of RVC. Created RFx processes are stored in a customer folder under the requirements models folder of RVC in Requirements Management and Systems Modeling app of Requirement Management capability of SAP EPD.
|
Note
|
RVC can only work with requirements models of Requirement Management capability of SAP EPD created with RVC. |
The following diagram visualizes the requirements management extension and the requirements model template of RVC.

The requirements model template of RVC includes the requirements management extension of RVC. The requirements management extension of RVC consists the classes Requirements Model and Requirement.
The class Requirements Model must contain the properties listed in the following table:
| Name | Code | Data Type | Default Value | List of Values | Complete | Multi-selection | RM Label | RM Section |
|---|---|---|---|---|---|---|---|---|
Counterpart |
CEN_COU |
String |
- |
- |
false |
false |
Name |
Custom Properties |
Currency |
CEN_CUR |
String |
- |
- |
false |
false |
Name |
Custom Properties |
Customer |
CEN_CUS |
String |
- |
- |
false |
false |
Name |
Custom Properties |
Deadline |
CEN_DEA |
Date |
- |
- |
false |
false |
Name |
Custom Properties |
Decomposer Rule Set |
CEN_DRS |
String |
@all |
@all |
false |
false |
Name |
Custom Properties |
Language |
CEN_LAN |
String |
- |
- |
false |
false |
Name |
Custom Properties |
Project Manager |
CEN_PRM |
String |
- |
- |
false |
false |
Name |
Custom Properties |
State |
CEN_PST |
String |
CR |
created (CR), in work (IW), completed (CO), aborted (CA), closed (CL) |
true |
false |
Name |
Custom Properties |
Requirements Engineer |
CEN_REE |
String |
- |
- |
false |
false |
Name |
Custom Properties |
Account Manager |
CEN_SAM |
String |
- |
- |
false |
false |
Name |
Custom Properties |
Time unit |
CEN_TUN |
String |
h |
hours (h), days (d), weeks (w), months (m), years (y) |
true |
false |
Name |
Custom Properties |
Description |
Description |
Text |
- |
- |
false |
false |
Project Scope |
Definition |
Name |
Name |
String |
- |
- |
false |
false |
Project ID |
General |
The class Requirement must contain the properties listed in the following table:
| Name | Code | Data Type | Default Value | List of Values | Complete | Multi-selection | RM Label | RM Section |
|---|---|---|---|---|---|---|---|---|
Acceptance Relevance |
CEN_ACC |
String |
undefined |
undefined, relevant, irrelevant |
true |
false |
Name |
Detail |
Additional Information 0 |
CEN_AD0 |
String |
- |
- |
false |
false |
Name |
External Information |
Additional Information 1 |
CEN_AD1 |
String |
- |
- |
false |
false |
Name |
External Information |
Additional Information 2 |
CEN_AD2 |
String |
- |
- |
false |
false |
Name |
External Information |
Additional Information 3 |
CEN_AD3 |
String |
- |
- |
false |
false |
Name |
External Information |
Additional Information 4 |
CEN_AD4 |
String |
- |
- |
false |
false |
Name |
External Information |
Additional Information 5 |
CEN_AD5 |
String |
- |
- |
false |
false |
Name |
External Information |
Additional Information 6 |
CEN_AD6 |
String |
- |
- |
false |
false |
Name |
External Information |
Additional Information 7 |
CEN_AD7 |
String |
- |
- |
false |
false |
Name |
External Information |
Additional Information 8 |
CEN_AD8 |
String |
- |
- |
false |
false |
Name |
External Information |
Additional Information 9 |
CEN_AD9 |
String |
- |
- |
false |
false |
Name |
External Information |
Contract Relevance |
CEN_CON |
String |
undefined |
undefined, relevant, irrelevant |
true |
false |
Name |
Detail |
Decomposer Result |
CEN_DEC |
Text |
- |
- |
false |
false |
Name |
Requirement Engineer |
Department |
CEN_DEP |
String |
- |
- |
false |
false |
Name |
General |
Exclusion |
CEN_EXC |
Text |
- |
- |
false |
false |
Name |
Subject Matter Experts |
Last Decomposition Date |
CEN_LDD |
Date |
- |
- |
false |
false |
Name |
Requirement Engineer |
Mitigation |
CEN_MIT |
Text |
- |
- |
false |
false |
Name |
Subject Matter Experts |
Previous Processor |
CEN_PPR |
String |
Requirements Engineer |
Department, Supplier, Customer, Project Manager, Requirements Engineer |
true |
false |
Name |
General |
Prerequisites |
CEN_PRE |
Text |
- |
- |
false |
false |
Name |
Subject Matter Experts |
Processor |
CEN_PRO |
String |
Requirements Engineer |
Department, Supplier, Customer, Project Manager, Requirements Engineer |
true |
false |
Name |
General |
Rating Processor |
CEN_RAP |
String |
undefined |
standard, modification, unfeasible, undefined |
true |
false |
Name |
Subject Matter Experts |
Rating Customer |
CEN_RAR |
String |
undefined |
accepted, not accepted, undefined |
true |
false |
Name |
Customer |
Risk Comment |
CEN_RIS |
Text |
- |
- |
false |
false |
Name |
Subject Matter Experts |
Rating Customer Comment |
CEN_RRC |
Text |
- |
- |
false |
false |
Name |
Customer |
Supplier |
CEN_SUP |
String |
- |
- |
false |
false |
Name |
Subject Matter Experts |
Comment |
Comment |
Text |
- |
- |
false |
false |
Rating Processor Comment |
Subject Matter Experts |
Priority |
Priority |
Float |
- |
undefined (0), must have (1), should have (2), could have (3), would have (4) |
false |
false |
Name |
General |
Risk |
Risk |
Integer |
- |
undefined (0), low (1), medium (2), high (3) |
false |
false |
Name |
Subject Matter Experts |
Status |
Status |
Integer |
0 |
in creation (0), decomposed (1), in evaluation (2), in clarification (3), in validation (4), validated (5) |
false |
false |
Name |
General |
Type |
Type |
String |
- |
Design (DSGN), Functional (solution) (FUNC), Technical (TECH), Non Functional (NOFUNC), Ignore (IGNO), Architectural (ARC), Business (BUS), User (stakeholder) (USR), Implementation (transition) (IMP), Regulatory (LAW), Quality-of-service (non-functional) (QOS) |
false |
false |
Category |
General |
Workload 1 |
Workload |
Float |
- |
- |
false |
false |
Estimated Costs |
Subject Matter Experts |
Workload 2 |
Workload2 |
Float |
- |
- |
false |
false |
Estimated Effort |
Subject Matter Experts |
|
Note
|
The standard properties Workload, Workload2 and Comment are not listed in the extension editor of Requirements Management and Systems Modeling app of SAP EPD. Out of that their RM Label can’t be renamed and they can’t be moved to the RM Section. |
Context
Configure the Requirement Management capability of SAP EPD for the usage within RVC.
Prerequisites
-
Procedure
-
To configure the shared setting of concurrent editing in Requirements Management and Systems Modeling app of SAP EPD follow the steps in Configuring Concurrent Editing.
-
To create the requirements management extension of RVC as described above
-
follow the steps in Creating Custom Extension Files.
or alternatively:
-
Download the requirements management extension of RVC as zip file from myCENIT.
-
Import the zip file in the folder Repository Root/Library/Resources/Extensions in Requirements Management and Systems Modeling app of SAP EPD. Therefore follow the steps in Transferring Content Between Repositories.
-
-
To create the requirements model template of RVC including the requirements management extension of RVC follow the steps in Making Your Customizations Available in the New Model Dialog.
-
To create the requirements models folder of RVC RVC under the folder Shared Folder in Requirements Management and Systems Modeling app of SAP EPD follow the steps in Browsing The Repository.
Next Steps
Continue with Pre configuration for Collaboration capability of SAP EPD.
1.2. Pre configuration for Collaboration capability of SAP EPD
RVC Collaboration Handler functionality shares requirements of a RFx process with suppliers or the customer either in a collaboration of type supplier or customer. Supplier or customer collaborations are technically collaborations of Collaboration capability of SAP EPD. The following diagram visualizes the collaboration types customer and supplier of RVC.

The collaboration type for customer consists of a specific Reference Object and a specific Collaboration Type.
The Reference Object for customers consists of the settings listed in the following table:
| Name | Value |
|---|---|
Object Type |
RVC customer REQUIREMENT |
Language |
EN |
Navigation URL |
<SAP Fiori Launchpad URL to RVC Evaluator for Customer>/CustomerCollaborations({Key3}) |
The Reference Object for customers must contain the additional fields listed in the following table:
| Field | Value | Data Type | Hide |
|---|---|---|---|
Key1 |
Requirement Model ID |
Text |
false |
Key2 |
Requirement ID |
Text |
false |
Key3 |
Collaboration ID |
Text |
false |
Non-Key1 |
Requirement Title |
Text |
false |
Non-Key2 |
Project ID |
Text |
false |
The Collaboration Type for customers consists of the settings listed in the following table:
| Name | Value |
|---|---|
ID |
CUS1 |
Description |
RVC customer collaboration |
Purpose |
|
Status Profile |
|
Processing Status Profile |
|
Associated Workflow |
- |
Associated Reference |
RVC customer REQUIREMENT |
Shared Product Data |
false |
Reference Objects |
true |
Design Models |
false |
History |
false |
Comments |
false |
Work Item |
false |
The collaboration type for suppliers consists of a specific Reference Object and a specific Collaboration Type.
The Reference Object for suppliers consists of the settings listed in the following table:
| Name | Value |
|---|---|
Object Type |
RVC supplier REQUIREMENT |
Language |
EN |
Navigation URL |
<SAP Fiori Launchpad URL to RVC Evaluator for Supplier>/SupplierCollaborations({Key3}) |
The Reference Object for suppliers must contain the additional fields listed in the following table:
| Field | Value | Data Type | Hide |
|---|---|---|---|
Key1 |
Requirement Model ID |
Text |
false |
Key2 |
Requirement ID |
Text |
false |
Key3 |
Collaboration ID |
Text |
false |
Non-Key1 |
Requirement Title |
Text |
false |
Non-Key2 |
Project ID |
Text |
false |
The Collaboration Type for suppliers consists of the settings listed in the following table:
| Name | Value |
|---|---|
ID |
SUP1 |
Description |
RVC supplier collaboration |
Purpose |
|
Status Profile |
|
Processing Status Profile |
|
Associated Workflow |
- |
Associated Reference |
RVC supplier REQUIREMENT |
Shared Product Data |
false |
Reference Objects |
true |
Design Models |
false |
History |
false |
Comments |
false |
Work Item |
false |
Context
Configure the Collaboration capability of SAP EPD for the usage within RVC.
Prerequisites
-
Procedure
-
To create the reference objects for suppliers and customers of RVC as described above follow the steps in Creating a Reference Object.
-
To create the collaboration type for suppliers and customers of RVC as described above follow the steps in Creating or Editing a Collaboration Type.
-
To activate the created collaboration types of RVC follow the steps in Managing a Collaboration Type.
Next Steps
Continue with Pre configuration for Teams in Manage Teams app of SAP EPD.
1.3. Pre configuration for Teams in Manage Teams app of SAP EPD
RVC Collaboration Handler functionality shares requirements of a RFx process with colleagues of departments, suppliers for departments or the customer for the follow-up evaluation. For suppliers and the customer the requirements are shared in a specific collaboration as described in Pre configuration for Collaboration capability of SAP EPD. For colleagues the requirements are directly accessible over the RVC Cockpit. Whereas the customer is referenced by the counterpart of a RFx process, colleagues and suppliers are organized in groups, which are technically teams in Manage Teams app of SAP EPD.
|
Note
|
RVC does not allow the usage of Teams containing blanks in their name as Collaboration capability of SAP EPD does not allow the assignment of Teams with blanks as participants. CENIT suggests to replace blanks with '-'. |
To identify teams in Manage Teams app representing departments the description of the team has to contain the Team Keyword Department.
To identify teams in Manage Teams app representing suppliers the description of the team has to contain the Team Prefix Supplier followed by
-
the department team name to tell RVC that the current team is used as a supplier for the specified department
or
-
* to tell RVC that the current team is used as a supplier for all departments.
Context
Configure teams in Manage Teams app of SAP EPD for the usage within RVC.
Prerequisites
-
Procedure
-
To create a team in Manage Teams app of SAP EPD follow the steps in Creating a Team.
NoteSelected users require specific permissions to use RVC. Refer section User Management to assign roles to users.
Next Steps
Continue with Onboarding.
2. Onboarding
This section contains information for onboarding to CENIT apps described in this documentation.
Context
Subscribing to CENIT apps.
Prerequisites
-
Technical Prerequisites have been complied.
-
Required capabilities of SAP EPD have been subscribed. Please refer section Connectivity for this purpose.
Procedure
-
To subscribe to the CENIT multi tenant applications follow the steps in Subscribing to the SaaS Applications.
Next Steps
Continue with Connectivity.
3. Connectivity
This section describes the configuration of destinations in the SAP BTP cockpit required for RVC to connect to other systems or other capabilities of SAP EPD. The following diagram visualizes the connections of RVC to other apps or services.
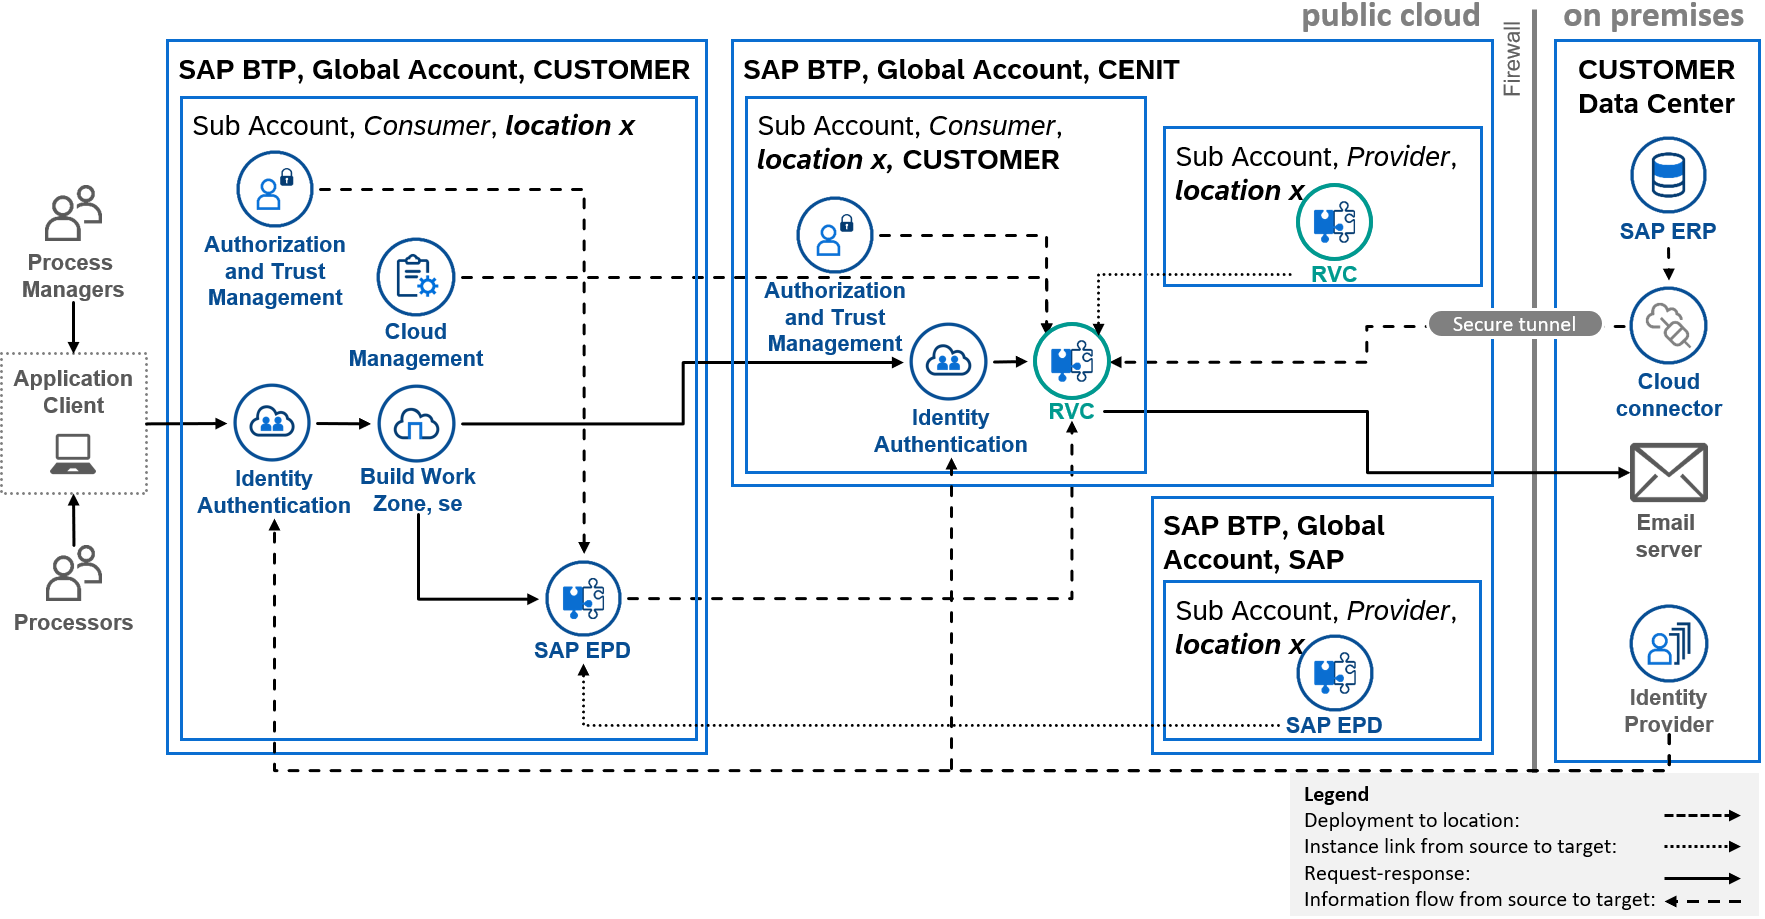
RVC is available in the Cloud Foundry Environment of SAP Business Technology Platform (BTP), and enhances the capabilities of SAP Enterprise Product Development (EPD). For each connection to RVC a destination must be configured. The required destinations are described in the following sub sections.
3.1. Destination for SAP Authorization and Trust Management
The destination to connect to SAP Authorization and Trust Management service requires the following fields:
| Field | Value |
|---|---|
Name |
RVC_SAPXSUAA |
Type |
HTTP |
Description |
Connection to SAP XSUAA |
URL |
Enter the value of apiurl from service key credentials. |
Proxy Type |
Internet |
Authentication |
OAuth2ClientCredentials |
Client ID |
Enter the value of clientid from service key credentials. |
Client Secret |
Enter the value of clientsecret from service key credentials. |
Token Service URL |
Enter the value of URL from service key credentials and append the path: /oauth/token |
It requires the following Additional Properties:
| Property | Value |
|---|---|
URL.headers.Application-Interface-Key |
a0expert |
The checkbox "Use the default JDK truststore" must be marked.
Context
Find, add, or edit the destination to connect to SAP Authorization and Trust Management service.
Prerequisites
-
Onboarding has been finished.
Procedure
-
In the web browser, log on to the SAP BTP cockpit, and choose the relevant sub account.
-
In the left panel, under Connectivity, choose Destinations.
-
Search for the destination name mentioned above.
-
If the destination exists, ensure that the configuration is as mentioned above.
-
If the destination does not exist, choose New Destination, and under Destination Configuration, enter the destination details as mentioned above.
TipTo create an additional property, choose New Property. In the dropdown field, enter the property name, and then specify the value.
-
-
Save your changes.
Next Steps
Continue with next destination.
3.2. Destination for SAP CLM
The destination to connect to APIs of SAP Cloud Management for SAP BTP (CLM) service requires the following fields:
| Field | Value |
|---|---|
Name |
RVC_SAPCLM |
Type |
HTTP |
Description |
Connection to SAP CLM |
URL |
Enter the value of apiurl from service key credentials. |
Proxy Type |
Internet |
Authentication |
OAuth2ClientCredentials |
Client ID |
Enter the value of clientid from service key credentials. |
Client Secret |
Enter the value of clientsecret from service key credentials. |
Token Service URL |
Enter the value of URL from service key credentials and append the path: /oauth/token |
It requires the following Additional Properties:
| Property | Value |
|---|---|
URL.headers.Application-Interface-Key |
a0expert |
The checkbox "Use the default JDK truststore" must be marked.
Context
Find, add, or edit the destination to connect to SAP CLM service.
Prerequisites
-
Onboarding has been finished.
Procedure
-
In the web browser, log on to the SAP BTP cockpit, and choose the relevant sub account.
-
In the left panel, under Connectivity, choose Destinations.
-
Search for the destination name mentioned above.
-
If the destination exists, ensure that the configuration is as mentioned above.
-
If the destination does not exist, choose New Destination, and under Destination Configuration, enter the destination details as mentioned above.
TipTo create an additional property, choose New Property. In the dropdown field, enter the property name, and then specify the value.
-
-
Save your changes.
Next Steps
Continue with next destination.
3.3. Destination for Collaboration capability of SAP EPD
The destination to connect to APIs of Collaboration capability of SAP EPD requires the following fields:
| Field | Value |
|---|---|
Name |
RVC_SAPEPD_Collaboration |
Type |
HTTP |
Description |
Connection to Collaboration capability of SAP EPD. |
URL |
Enter the value of apiurl from service key credentials. |
Proxy Type |
Internet |
Authentication |
OAuth2ClientCredentials |
Client ID |
Enter the value of clientid from service key credentials. |
Client Secret |
Enter the value of clientsecret from service key credentials. |
Token Service URL |
Enter the value of URL from service key credentials and append the path: /oauth/token |
It requires the following Additional Properties:
| Property | Value |
|---|---|
URL.headers.Application-Interface-Key |
a0expert |
FLP_URL |
Enter the value of the SAP Fiori Launchpad url of My Collaborations app |
The checkbox "Use the default JDK truststore" must be marked.
Context
Find, add, or edit the destination to connect to Collaboration capability of SAP EPD.
Prerequisites
-
Onboarding has been finished.
Procedure
-
In the web browser, log on to the SAP BTP cockpit, and choose the relevant sub account.
-
In the left panel, under Connectivity, choose Destinations.
-
Search for the destination name mentioned above.
-
If the destination exists, ensure that the configuration is as mentioned above.
-
If the destination does not exist, choose New Destination, and under Destination Configuration, enter the destination details as mentioned above.
TipTo create an additional property, choose New Property. In the dropdown field, enter the property name, and then specify the value.
-
-
Save your changes.
Next Steps
Continue with next destination.
3.4. Destination for Teams and Users of Common Functions capability of SAP EPD
The destination to connect to Teams and Users APIs of Common Functions capability of SAP EPD requires the following fields:
| Field | Value |
|---|---|
Name |
RVC_SAPEPD_Common |
Type |
HTTP |
Description |
Connection to SAP EPD Common Functions |
URL |
Enter the value of apiurl from service key credentials. |
Proxy Type |
Internet |
Authentication |
OAuth2ClientCredentials |
Client ID |
Enter the value of clientid from service key credentials. |
Client Secret |
Enter the value of clientsecret from service key credentials. |
Token Service URL |
Enter the value of URL from service key credentials and append the path: /oauth/token |
It requires the following Additional Properties:
| Property | Value |
|---|---|
URL.headers.Application-Interface-Key |
a0expert |
The checkbox "Use the default JDK truststore" must be marked.
Context
Find, add, or edit the destination to connect to teams and users of Common Functions capability of SAP EPD.
Prerequisites
-
Onboarding has been finished.
Procedure
-
In the web browser, log on to the SAP BTP cockpit, and choose the relevant sub account.
-
In the left panel, under Connectivity, choose Destinations.
-
Search for the destination name mentioned above.
-
If the destination exists, ensure that the configuration is as mentioned above.
-
If the destination does not exist, choose New Destination, and under Destination Configuration, enter the destination details as mentioned above.
TipTo create an additional property, choose New Property. In the dropdown field, enter the property name, and then specify the value.
-
-
Save your changes.
Next Steps
Continue with next destination.
3.5. Destination for Requirement Management capability of SAP EPD
The destination to connect to APIs of Requirement Management capability of SAP EPD requires the following fields:
| Field | Value |
|---|---|
Name |
RVC_SAPEPD_EAD |
Type |
HTTP |
Description |
Connection to Requirements Management and Systems Modeling services of Requirement Management capability of SAP EPD. |
URL |
Enter the value of apiurl from service key credentials. |
Proxy Type |
Internet |
Authentication |
OAuth2ClientCredentials |
Client ID |
Enter the value of clientid from service key credentials. |
Client Secret |
Enter the value of clientsecret from service key credentials. |
Token Service URL |
Enter the value of URL from service key credentials and append the path: /oauth/token |
It requires the following Additional Properties:
| Property | Value |
|---|---|
URL.headers.Application-Interface-Key |
a0expert |
FLP_URL |
Enter the value of the SAP Fiori Launchpad url of Requirements Management and Systems Modeling app |
The checkbox "Use the default JDK truststore" must be marked.
Context
Find, add, or edit the destination to connect to Requirement Management capability of SAP EPD.
Prerequisites
-
Onboarding has been finished.
Procedure
-
In the web browser, log on to the SAP BTP cockpit, and choose the relevant sub account.
-
In the left panel, under Connectivity, choose Destinations.
-
Search for the destination name mentioned above.
-
If the destination exists, ensure that the configuration is as mentioned above.
-
If the destination does not exist, choose New Destination, and under Destination Configuration, enter the destination details as mentioned above.
TipTo create an additional property, choose New Property. In the dropdown field, enter the property name, and then specify the value.
-
-
Save your changes.
Next Steps
Continue with next destination.
3.6. Destination for Email Server
This destination applies to these use cases:
-
Inform colleagues of departments about assigned requirements for evaluation
The destination to connect to the Email Server requires the following fields:
| Field | Value |
|---|---|
Name |
RVC_mail |
Type |
|
Description |
Used for sending mails to invoked colleagues. |
Proxy Type |
Internet |
Authentication |
BasicAuthentication |
User |
Enter the user for logging in to the mail server. |
Password |
Enter the password for logging in to the mail server. |
It requires the following Additional Properties:
| Property | Value |
|---|---|
mail.smtp.auth |
true |
mail.smtp.from |
Mail address to use as the "From" address of mails sent by the capability. |
mail.smtp.host |
Host name of your mail server. |
mail.smtp.port |
Port on which your mail server listens for connections (typically 587, in rare cases 465). |
mail.smtp.starttls.enable |
true |
mail.smtp.starttls.required |
true |
mail.transport.protocol |
smtp |
Context
Find, add, or edit the destination for sending email notifications.
Prerequisites
-
Onboarding has been finished.
Procedure
-
In the web browser, log on to the SAP BTP cockpit, and choose the relevant sub account.
-
In the left panel, under Connectivity, choose Destinations.
-
Search for the destination name mentioned above.
-
If the destination exists, ensure that the configuration is as mentioned above.
-
If the destination does not exist, choose New Destination, and under Destination Configuration, enter the destination details as mentioned above.
TipTo create an additional property, choose New Property. In the dropdown field, enter the property name, and then specify the value.
-
-
Save your changes.
Next Steps
Continue with next destination.
4. User Management
This section describes the configuration of user management for RVC. According to that RVC provides role collections and role templates. The figure below gives an overview about the role collections:

Role collections combine several role templates. RVC provides the following role templates:
Role Template |
Description |
Tiles on SAP Fiori Launchpad |
Features |
RVCAdmin |
Role to perform basic configuration for RVC. |
RVC Basic Configuration |
|
RVCAdminBusiness |
Role to perform business configuration for RVC. |
RVC Decomposer Configuration |
|
RVCManagerAccount |
Role to view RFx processes and their requirements in any state and to extract data for quote. |
RVC Cockpit |
|
RVCManagerProject |
Role to create, modify and manage RFx processes. |
RVC Cockpit |
|
RVCManagerRequirements |
Role to decompose and quality-check RFx processes and their requirements. |
RVC Cockpit |
|
RVCProcessorDepartment |
Role to evaluate and explore assigned requirements. |
RVC Cockpit |
|
RVCProcessoSupplier |
Role to evaluate assigned requirements. |
My Collaborations |
|
RVCProcessoCustomer |
Role to evaluate assigned requirements. |
My Collaborations |
|
The default role collections contain the above role templates:
Role Collections |
||||||||
Role Template |
cenit-sap-rvcAdmin |
cenit-sap-rvcAdminBusiness |
cenit-sap-rvcManagerAccount |
cenit-sap-rvcManagerProject |
cenit-sap-rvcManagerRequirements |
cenit-sap-rvcProcessorDepartment |
cenit-sap-rvcProcessorSupplier |
cenit-sap-rvcProcessorCustomer |
RVCAdmin |
x |
|||||||
RVCAdminBusiness |
x |
|||||||
RVCManagerAccount |
x |
|||||||
RVCManagerProject |
x |
|||||||
RVCManagerRequirements |
x |
|||||||
RVCProcessorDepartment |
x |
|||||||
RVCProcessorSupplier |
x |
|||||||
RVCProcessorCustomer |
x |
|||||||
The default role collections cannot be deleted. They reflect typical user scenarios. If they don’t meet your requirements, you can, of course, build your own role collections.
|
Note
|
RVCManager* role collections and RVCProcessor* role collections can’t be combined. |
Context
Assign role collections of RVC to created users or user groups.
Prerequisites
-
Connectivity has been set up.
-
Users and user groups have been created in the identity provider (IdP).
NoteUse of the SAP Cloud Identity - Identity Authentication service is mandatory. Find more information in the SAP BTP documentation under Manually Establish Trust and Federation Between UAA and Identity Authentication.
Procedure
-
If needed, create a new role collection as described here: Define a Role Collection.
-
Assign the existing application roles to new or existing role collection as described here: Add Roles to a Role Collection.
-
Assign role collections to users or user groups in the Identity Authentication service as described here: Managing Users with the Identity Authentication Service.
Next Steps
Continue with setting up the Entry Points.
4.1. Metering
The usage of RVC is metered in capacity units. The total capacity unit is equal to the number of units consumed by the usage of the service. The multiplier used to calculate this usage fee differs for the service type.
Role Template |
Service Type |
Capacity Units |
RVCAdmin |
RVC Admin Edition |
0 |
RVCAdminBusiness |
RVC Admin Edition |
0 |
RVCManagerAccount |
RVC Professional Edition |
70 |
RVCManagerProject |
RVC Professional Edition |
70 |
RVCManagerRequirements |
RVC Professional Edition |
70 |
RVCProcessorDepartment |
RVC Standard Edition |
30 |
RVCProcessoSupplier |
RVC Standard Edition |
30 |
RVCProcessoCustomer |
RVC Standard Edition |
30 |
|
Note
|
The roles templates included in a service type and the capacity units can change over time. Check the latest terms and conditions of Requirements Valuation Cockpit (RVC) by CENIT. If you have questions about to count of consumed capacity units please contact CENIT Support. |
5. Entry Points
This section describes the configuration of SAP Fiori Launchpad as entry point to access all apps in a single entry point.
Context
Access all apps in a single entry point.
Prerequisites
-
User Management has been set up.
-
SAP Build Work Zone, standard edition has been subscribed and configured.
Procedure
-
Follow the steps to configure the SAP Launchpad Service with Multiple Capabilities.
Next Steps
Continue with performing the Basic Configuration.
5.1. Supported Languages
The user interfaces of the CENIT App described in this documentation and in-app help (where available) are provided in the following languages:
-
English
The documentations of the CENIT App described in this documentation are available in the following languages:
-
English
6. Basic Configuration
This section describes the basic configuration of RVC. RVC requires some basic configuration to use requirements models & requirements, collaborations and teams from SAP EPD.
The configuration for the usage of requirements models & requirements from SAP EPD consists of the following settings:
| Setting | Description | Default Value |
|---|---|---|
Requirements Management Extension |
Requirements management extension of RVC in Repository Explorer of Requirements Management and Systems Modeling app of SAP EPD in Repository Root/Library/Resources/Extensions folder. |
CENIT RFQ Requirements Model |
Requirements Model Template |
Requirements model template of RVC in Repository Explorer of Requirements Management and Systems Modeling app of SAP EPD in Repository Root/Library/Resources/Model Templates folder. |
CENIT_RFQ |
Requirements Models Folder |
Requirements models folder of RVC in Repository Explorer of Requirements Management and Systems Modeling app of SAP EPD under Repository Root folder. |
/Shared Folder/RVC/ |
For the values of the settings refer Pre configuration for Requirement Management capability of SAP EPD.
The configuration for the usage of collaborations from SAP EPD consists of the following settings:
| Setting | Description | Default Value |
|---|---|---|
Collaboration Type Supplier |
RVC collaboration type for supplier in Collaboration capability of SAP EPD. |
SUP1 |
Collaboration Type Customer |
RVC collaboration type for customer in Collaboration capability of SAP EPD. |
CUS1 |
Collaboration RO Requirement Supplier |
RVC collaboration reference object requirement for supplier in Collaboration capability of SAP EPD. |
RVC supplier REQUIREMENT |
Collaboration RO Requirement Customer |
RVC collaboration reference object requirement for customer in Collaboration capability of SAP EPD. |
RVC customer REQUIREMENT |
For the values of the settings refer Pre configuration for Collaboration capability of SAP EPD.
The configuration for the usage of teams from Manage Teams services of SAP EPD consists of the following settings:
| Setting | Description | Default Value |
|---|---|---|
Team Keyword Department |
Teams defined in Manage Teams app of SAP EPD which contain the team keyword for department in their description are used as department teams in RVC. The contain functionality is executed case-sensitive. |
rvc-department |
Team Prefix Supplier |
Teams defined in Manage Teams app of SAP EPD which contain the team prefix for supplier followed by the name of a department team of RVC are used as supplier team of the department team in RVC. The contain functionality is executed case-sensitive. |
rvc-supplier_ |
For the values of the settings refer Pre configuration for Teams in Manage Teams app of SAP EPD.
Context
Configure the basic configuration of RVC.
Prerequisites
-
Entry Points are set up.
-
Role RVCAdmin is assigned to your user.
-
You can access RVC Basic Configuration from the SAP Fiori Launchpad.
Procedure
-
Logon to SAP Fiori Launchpad in your web browser.
-
Open the RVC Basic Configuration.
-
Configure the fields described above.
Next Steps
Continue with performing the Business Configuration for RVC.
7. Offboarding
This section contains information for offboarding from RVC.
7.1. Offboarding users of RVC
For offboarding users the described steps in the documentation of SAP EPD apply.
7.2. Exporting Data from RVC
RVC Basic Configuration app allows to export the configuration data of RVC from the data base. Business data handled in RVC are completely stored in the capabilities of SAP EPD. To export data from the capabilities of SAP EPD refer Data Export and Data Deletion.
Context
Export the configuration data of RVC from the data base.
Prerequisites
-
Role RVCAdmin is assigned to your user.
-
You can access RVC Basic Configuration app from the SAP Fiori Launchpad.
Procedure
-
Logon to SAP Fiori Launchpad in your web browser.
-
Open the RVC Decomposer Configuration app.
-
Choose Export to Spreadsheet and select the file format and directory on your local disc.
Next Steps
-
7.3. Deleting Data from RVC
RVC Basic Configuration app allows to export the configuration data of RVC from the data base. Business data handled in RVC are completely stored in the capabilities of SAP EPD. To delete data from the capabilities of SAP EPD refer Data Export and Data Deletion.
Context
Delete the configuration data of RVC from the data base.
Prerequisites
-
Role RVCAdmin is assigned to your user.
-
You can access RVC Basic Configuration app from the SAP Fiori Launchpad.
Procedure
-
Logon to SAP Fiori Launchpad in your web browser.
-
Open the RVC Basic Configuration app.
-
Select the data you want to delete.
-
Click on Delete.
-
Confirm with Delete.
CautionOnce you delete the data, it cannot be restored.
Next Steps
-
Glossary
CENIT on premises App
CENIT on premises App refers to applications/software created by CENIT which the licensee installs, operates, runs and uses under its own responsibility in its own environment.
CENIT cloud App
CENIT cloud App refers to applications/software created by CENIT that are provided, operated and executed on a cloud platform such as Amazon Web Service (AWS), Google Cloud Platform (GCP), Mircosoft Azure (MS Azure) or SAP Business Technology Platform (BTP) by CENIT and used by licensees.
CENIT mobile App
CENIT mobile App refers to applications/software created by CENIT that are installed, executed and used by the licensee on mobile operating systems such as iOS or Android on corresponding end devices.
CENIT App
CENIT App refers to CENIT on premises App, CENIT cloud App and CENIT mobile App.
SW Purchase Contract
The SW Purchase Contract is the contract agreed between the licensee and CENIT for the use of a specific CENIT on premises App in perpetuity.
Program certificate for permanent SW
The Program certificate for permanent SW is the document attached to the order confirmation by CENIT for a specific CENIT on premises App, which contains the licenses for this CENIT on premises App ordered in the SW Purchase Contract with the number and license start date.
SW Rental Contract
The SW Rental Contract is the contract agreed between the licensee and CENIT for the use of a specific CENIT App for a period of time.
Program certificate for temporary SW
The Program certificate for temporary SW is the document attached to the order confirmation by CENIT for a specific CENIT App, which contains the licenses for this CENIT App ordered in the SW Rental Contract with the number, license start date and minimum terms.
Program description
The program description is the description of the designated CENIT App contained in the Program certificate for permanent SW or the Program certificate for temporary SW.
Program documentation
The program documentation is the documentation of the CENIT App identified in the Program certificate for permanent SW or the Program certificate for temporary SW.
Hotline Service
Service of CENIT for the receipt of error messages for applications/software and elimination of the error message by simple bypass solution (first level support). If a simple workaround is not possible, the error message is forwarded to the support infrastructure of the respective manufacturer of the applications/software.
Support Service
Service of CENIT to resolve malfunctions that occur during the licensee’s contractual use of the applications/software (second level support).
Update Service
Service of CENIT to provide new program versions of the applications/software and associated program documentation to the licensee.
Provide
CENIT provides licensed CENIT on premises App, additional files for licensed CENIT App and program documentation for licensed CENIT App to licensees for download on the portal of CENIT or the portal of a contractor.
Install
The licensee copies the licensed CENIT on premises App or CENIT mobile App under its own responsibility into its own environment to configure, operate and use it.
Configure
The licensee configures the licensed CENIT App under its own responsibility in its own environment using the configuration options specified in the program documentation of the CENIT App. Configuration is understood to be both the initial configuration after installation of the CENIT App and the business configuration of the CENIT App for use by the users.
Customize
The licensee extends the licensed CENIT on premises App under its own responsibility in its own environment using exclusively the exits/extension interfaces listed in the program documentation of the CENIT on premises App.
Implement
Summarizes the installation, configuration and customization of a CENIT on premises App.
Deploy
CENIT deploys a CENIT cloud App on the respective cloud platform of CENIT for operation.
Operate
CENIT operates a CENIT cloud App provided on the respective cloud platform of CENIT by CENIT. CENIT is thus responsible for providing updates for this CENIT cloud App on the respective cloud platform of CENIT.
Run
A CENIT cloud App runs on the cloud platform of CENIT. Licensees can use the CENIT cloud App after subscribing to its cloud platform.
Offer
CENIT offers a CENIT App on the homepage of CENIT so that customers can order this CENIT App.
Buy
Customers enter into a SW Purchase Contract or SW Rental Contract with CENIT to get licenses for the use of a specific CENIT App.
Whitelisting
CENIT whitelists a licensees cloud platform to activate a specific CENIT cloud App on the licensee’s cloud platform so that the licensee can subscribe to this CENIT cloud App.
Subscribe
Licensees subscribe to a CENIT cloud App on their cloud platform to use it.
Usage
Licensee users who have subscribed to a CENIT cloud App or installed a CENIT on premises App or CENIT mobile App may use this CENIT App for their business purposes.
Getting Support
This section describes how you can get support from CENIT in case of an unexpected behavior occurs in any CENIT App.
Context
The get support the following questions have to be answered:
-
To which application/software do you need support?
-
What is the version of the application/software?
-
What is the issue?
-
What is the expected behavior?
-
What are the steps to reproduce the issue?
Prerequisites
-
Access to CENIT Support Portal.
or
-
Permission to write email to CENIT Support.
Procedure
-
Open CENIT Support Portal and login.
-
Create an new support ticket with New Request.
-
Fill out at least the following fields:
Field Value Title
What is the issue?
Priority
low or normal or urgent
Type of Incident
Failure or Service Request
Category
To which application/software do you need support?
Version/Release
What is the version of the application/software?
Description
What is the expected behavior?
What are the steps to reproduce the issue?
-
Submit your support request with Save.
or
-
-
Open your company email account.
-
Create an email to CENIT Support.
-
Give answers to the above listed questions in the email body.
-
Submit your support request.
-
Giving Feedback
This section describes how you can give feedback to CENIT about your user experience for any {cenit-app].
Context
In order to provide evaluable feedback, we would like to ask you to answer the following questions:
-
To which application/software do you want to give feedback?
-
What is the version of the application/software?
-
What is the feedback about?
-
How satisfied you are with the application/software as a whole?
-
Does the application/software meet your requirements and is easy to use?
-
Which additional feedback do you have that could help us to improve your user experience with the application/software?
Prerequisites
-
Access to CENIT Support Portal.
or
-
Permission to write email to CENIT Support.
Procedure
-
Open CENIT Support Portal and login.
-
Create an new support ticket with New Request.
-
Fill out at least the following fields:
Field Value Title
What is the feedback about?
Priority
normal
Type of Incident
PER
Category
To which application/software do you want to give feedback?
Version/Release
What is the version of the application/software?
Description
How satisfied you are with the application/software as a whole?
Does the application/software meet your requirements and is easy to use?
Which additional feedback do you have that could help us to improve your user experience with the application/software?
-
Submit your feedback with Save.
or
-
-
Open your company email account.
-
Create an email to CENIT Support.
-
Give answers to the above listed questions in the email body.
-
Submit your feedback.
-