Overview
This configuration guide describes the steps to perform as a business administrator or key user to configure Requirements Valuation Cockpit (RVC) by CENIT according to business needs.
About Requirements Valuation Cockpit (RVC) by CENIT
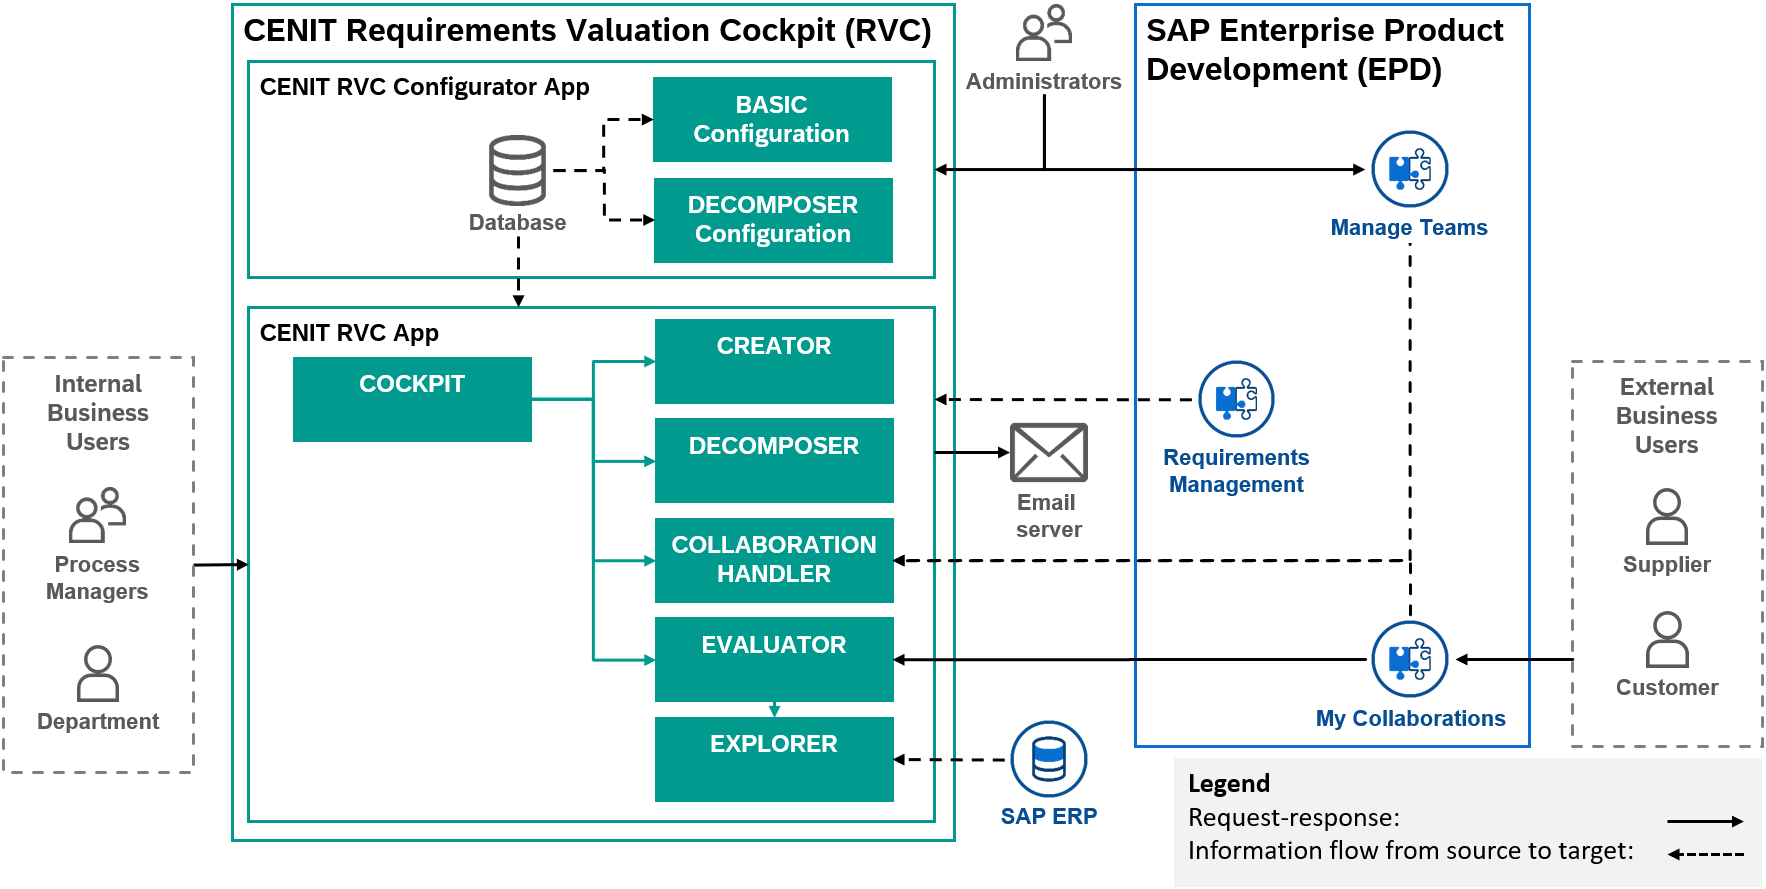
RVC helps to shorten time-to-quote in Request for Information, Proposal or Quote (RFx) processes by providing a central interface for managing and processing customer requirements in order to offer a high-quality solution for the customer in the shortest possible time.
The following diagram shows the solution concept:
1. Business Configuration for RVC
This section describes the steps to perform business configuration for RVC.
1.1. How to configure rule sets for RVC Decomposer?
A rule set summarizes all rules with are used together in the decomposing process.
|
Note
|
@all is the initially delivered rule set. |
Context
Configure rule sets for the decomposer.
Prerequisites
-
Role RVCBusinessAdmin is assigned to your user.
-
You can access RVC Decomposer Configuration from the SAP Fiori Launchpad.
Procedure
-
Logon to SAP Fiori Launchpad in your web browser.
-
Open the RVC Decomposer Configuration.
-
Click on Rulesets.
-
Choose the transaction Create or Delete.
-
Enter the specific rule set name.
-
Confirm with Create.
Next Steps
Continue with How to configure properties for RVC Decomposer?.
1.2. How to configure properties for RVC Decomposer?
A property is the requirement property where a rule points to.
Context
Configure properties for the decomposer rules.
|
Note
|
In this version of RVC, only the standard configuration of the requirement properties (Category, Department, Priority) will be set up. Only these three requirement properties are configured and can be decomposed. |
Prerequisites
-
Role RVCBusinessAdmin is assigned to your user.
-
You can access RVC Decomposer Configuration from the SAP Fiori Launchpad.
Procedure
-
Logon to SAP Fiori Launchpad in your web browser.
-
Open the RVC Decomposer Configuration.
-
Click on Properties.
-
Choose the transaction Create or Delete.
-
Enter the specific rule set name.
-
Link this property to the specific value.
 Illustration 2. RVC Decomposer Configuration app - create a property
 -
Confirm with Create.
Next Steps
Continue with How to configure property values for RVC Decomposer?.
1.3. How to configure property values for RVC Decomposer?
A property value is the value for a requirement property which is set for the property after one of the keywords of a rule matches.
Context
Configure values of properties for the decomposer rules.
Prerequisites
-
Properties are created as described in How to configure properties for RVC Decomposer?
Procedure
-
Logon to SAP Fiori Launchpad in your web browser.
-
Open the RVC Decomposer Configuration.
-
Click on Values.
-
Choose the transaction Create or Delete.
-
Select the property that is linked to the value.
-
Enter the name of the value.
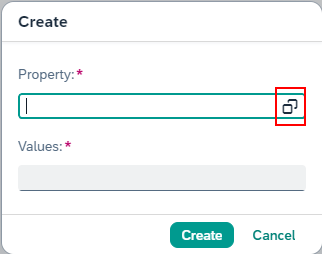 Illustration 3. RVC Decomposer Configuration app - create values of a propertyNote
Each value is linked to a property. If a filter for a property is selected the filter for the value is adapted. Only the linked values to the property are listed.
-
Confirm with Create.
Next Steps
Continue with How to configure rules for RVC Decomposer?.
1.4. How to configure rules for RVC Decomposer?
A rule includes all the given parameters together. According to these rules, the decomposing process is carried out.
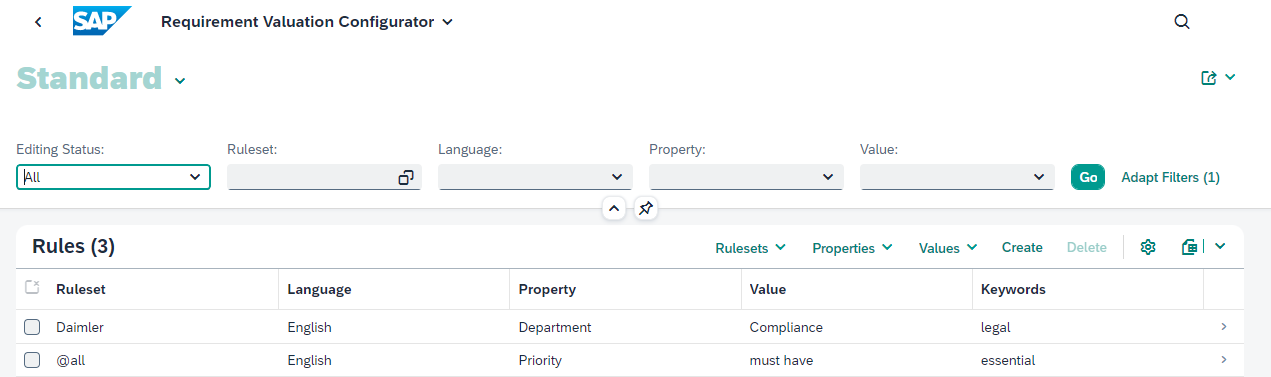
Assuming the rule set Daimler is selected for the decomposing process. If the keyword legal matches the title or description of the requirement, the value Compliance will be set in the property Department of the requirement.
Context
Configure rules with keywords for the decomposing process of the requirements. keywords are essential, these are compared with the title and the description of the requirements and finally display the defined value.
Prerequisites
-
At least one rule set is created as described in How to configure rule sets for RVC Decomposer?
-
Properties are created as described in How to configure properties for RVC Decomposer?
Procedure
-
Logon to SAP Fiori Launchpad in your web browser.
-
Open the RVC Decomposer Configuration.
-
Click on Create to set a new rule.
-
Select the
-
Rule set
-
Language
-
Property
-
Value
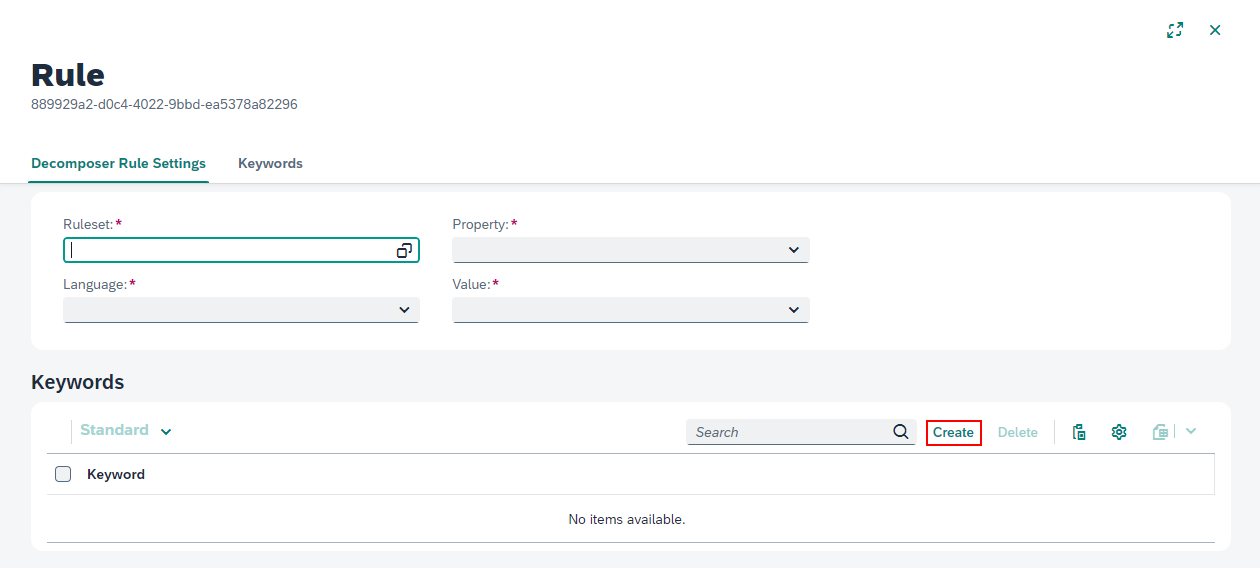 Illustration 5. RVC Decomposer Configuration app - create a rule
-
-
Configure the keywords for the decomposer.
Next Steps
Inform your business users that they can use the apps of RVC provided in the SAP Fiori Launchpad.
Glossary
CENIT on premises App
CENIT on premises App refers to applications/software created by CENIT which the licensee installs, operates, runs and uses under its own responsibility in its own environment.
CENIT cloud App
CENIT cloud App refers to applications/software created by CENIT that are provided, operated and executed on a cloud platform such as Amazon Web Service (AWS), Google Cloud Platform (GCP), Mircosoft Azure (MS Azure) or SAP Business Technology Platform (BTP) by CENIT and used by licensees.
CENIT mobile App
CENIT mobile App refers to applications/software created by CENIT that are installed, executed and used by the licensee on mobile operating systems such as iOS or Android on corresponding end devices.
CENIT App
CENIT App refers to CENIT on premises App, CENIT cloud App and CENIT mobile App.
SW Purchase Contract
The SW Purchase Contract is the contract agreed between the licensee and CENIT for the use of a specific CENIT on premises App in perpetuity.
Program certificate for permanent SW
The Program certificate for permanent SW is the document attached to the order confirmation by CENIT for a specific CENIT on premises App, which contains the licenses for this CENIT on premises App ordered in the SW Purchase Contract with the number and license start date.
SW Rental Contract
The SW Rental Contract is the contract agreed between the licensee and CENIT for the use of a specific CENIT App for a period of time.
Program certificate for temporary SW
The Program certificate for temporary SW is the document attached to the order confirmation by CENIT for a specific CENIT App, which contains the licenses for this CENIT App ordered in the SW Rental Contract with the number, license start date and minimum terms.
Program description
The program description is the description of the designated CENIT App contained in the Program certificate for permanent SW or the Program certificate for temporary SW.
Program documentation
The program documentation is the documentation of the CENIT App identified in the Program certificate for permanent SW or the Program certificate for temporary SW.
Hotline Service
Service of CENIT for the receipt of error messages for applications/software and elimination of the error message by simple bypass solution (first level support). If a simple workaround is not possible, the error message is forwarded to the support infrastructure of the respective manufacturer of the applications/software.
Support Service
Service of CENIT to resolve malfunctions that occur during the licensee’s contractual use of the applications/software (second level support).
Update Service
Service of CENIT to provide new program versions of the applications/software and associated program documentation to the licensee.
Provide
CENIT provides licensed CENIT on premises App, additional files for licensed CENIT App and program documentation for licensed CENIT App to licensees for download on the portal of CENIT or the portal of a contractor.
Install
The licensee copies the licensed CENIT on premises App or CENIT mobile App under its own responsibility into its own environment to configure, operate and use it.
Configure
The licensee configures the licensed CENIT App under its own responsibility in its own environment using the configuration options specified in the program documentation of the CENIT App. Configuration is understood to be both the initial configuration after installation of the CENIT App and the business configuration of the CENIT App for use by the users.
Customize
The licensee extends the licensed CENIT on premises App under its own responsibility in its own environment using exclusively the exits/extension interfaces listed in the program documentation of the CENIT on premises App.
Implement
Summarizes the installation, configuration and customization of a CENIT on premises App.
Deploy
CENIT deploys a CENIT cloud App on the respective cloud platform of CENIT for operation.
Operate
CENIT operates a CENIT cloud App provided on the respective cloud platform of CENIT by CENIT. CENIT is thus responsible for providing updates for this CENIT cloud App on the respective cloud platform of CENIT.
Run
A CENIT cloud App runs on the cloud platform of CENIT. Licensees can use the CENIT cloud App after subscribing to its cloud platform.
Offer
CENIT offers a CENIT App on the homepage of CENIT so that customers can order this CENIT App.
Buy
Customers enter into a SW Purchase Contract or SW Rental Contract with CENIT to get licenses for the use of a specific CENIT App.
Whitelisting
CENIT whitelists a licensees cloud platform to activate a specific CENIT cloud App on the licensee’s cloud platform so that the licensee can subscribe to this CENIT cloud App.
Subscribe
Licensees subscribe to a CENIT cloud App on their cloud platform to use it.
Usage
Licensee users who have subscribed to a CENIT cloud App or installed a CENIT on premises App or CENIT mobile App may use this CENIT App for their business purposes.
Getting Support
This section describes how you can get support from CENIT in case of an unexpected behavior occurs in any CENIT App.
Context
The get support the following questions have to be answered:
-
To which application/software do you need support?
-
What is the version of the application/software?
-
What is the issue?
-
What is the expected behavior?
-
What are the steps to reproduce the issue?
Prerequisites
-
Access to CENIT Support Portal.
or
-
Permission to write email to CENIT Support.
Procedure
-
Open CENIT Support Portal and login.
-
Create an new support ticket with New Request.
-
Fill out at least the following fields:
Field Value Title
What is the issue?
Priority
low or normal or urgent
Type of Incident
Failure or Service Request
Category
To which application/software do you need support?
Version/Release
What is the version of the application/software?
Description
What is the expected behavior?
What are the steps to reproduce the issue?
-
Submit your support request with Save.
or
-
-
Open your company email account.
-
Create an email to CENIT Support.
-
Give answers to the above listed questions in the email body.
-
Submit your support request.
-
Giving Feedback
This section describes how you can give feedback to CENIT about your user experience for any {cenit-app].
Context
In order to provide evaluable feedback, we would like to ask you to answer the following questions:
-
To which application/software do you want to give feedback?
-
What is the version of the application/software?
-
What is the feedback about?
-
How satisfied you are with the application/software as a whole?
-
Does the application/software meet your requirements and is easy to use?
-
Which additional feedback do you have that could help us to improve your user experience with the application/software?
Prerequisites
-
Access to CENIT Support Portal.
or
-
Permission to write email to CENIT Support.
Procedure
-
Open CENIT Support Portal and login.
-
Create an new support ticket with New Request.
-
Fill out at least the following fields:
Field Value Title
What is the feedback about?
Priority
normal
Type of Incident
PER
Category
To which application/software do you want to give feedback?
Version/Release
What is the version of the application/software?
Description
How satisfied you are with the application/software as a whole?
Does the application/software meet your requirements and is easy to use?
Which additional feedback do you have that could help us to improve your user experience with the application/software?
-
Submit your feedback with Save.
or
-
-
Open your company email account.
-
Create an email to CENIT Support.
-
Give answers to the above listed questions in the email body.
-
Submit your feedback.
-