Overview
This user guide describes the usage of Requirements Valuation Cockpit (RVC) by CENIT for business users.
|
Note
|
To have always the latest update and the right data, please delete your browser cache frequently. More detailed information about the browser and further browser settings can be found here: SAP Help Browsers and Browser Settings |
About Requirements Valuation Cockpit (RVC) by CENIT
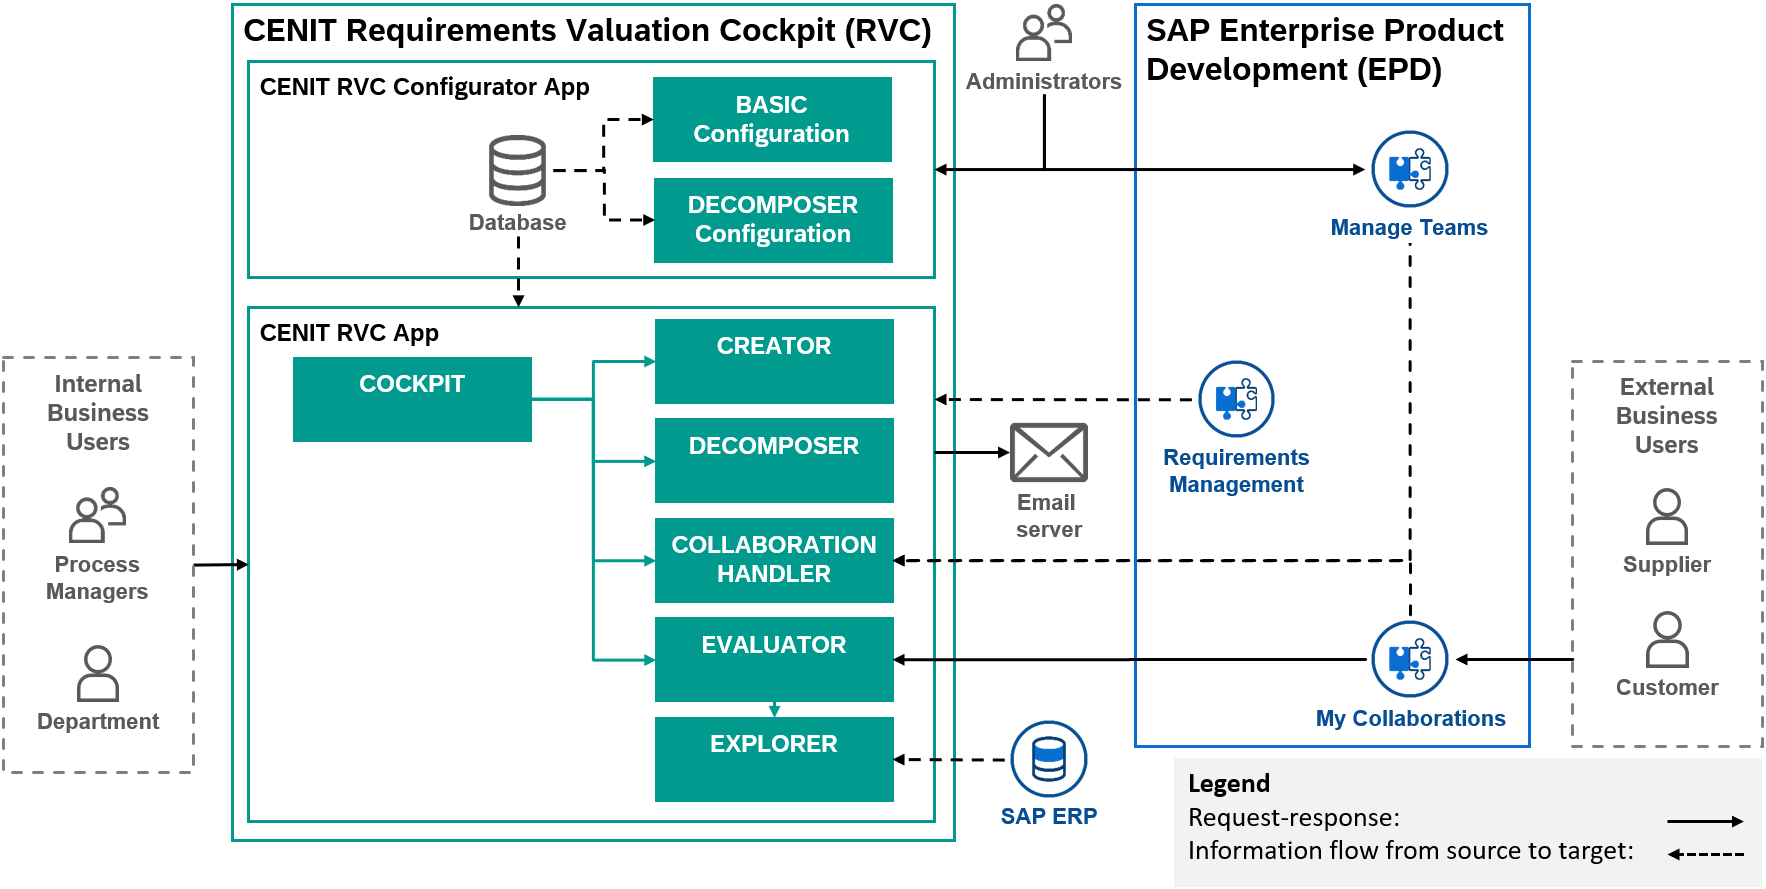
RVC helps to shorten time-to-quote in Request for Information, Proposal or Quote (RFx) processes by providing a central interface for managing and processing customer requirements in order to offer a high-quality solution for the customer in the shortest possible time.
The following diagram shows the solution concept:
1. User Guide
This section explains the usage of RVC for business users.
RVC bases on Requirement Management capability of SAP EPD and helps companies evaluate customer specifications as part of RFx processes.
|
Note
|
RVC can only work with requirements models of Requirement Management capability of SAP EPD created with RVC. |
It provides a central interface for stakeholder to evaluate customer requirements, costs and feasibility. RVC enables companies to make informed decisions and prioritize the requirements that are most important to the business. By using RVC, companies can ensure that tender processes are handled efficiently and effectively, and that projects are delivered with high quality and on time.
Therefore RVC offers additional functions to Project Managers, Requirement Engineers and Account Managers for processing the RFx process and for colleagues, suppliers and the customer to process requirements assigned to them. The mentioned role collections reflect typical user scenarios. In the table you can see which user actions are allowed per role collection:
| Role Collection | Role | User Actions |
|---|---|---|
Project Manager |
RVCManagerProject |
|
Requirements Engineer |
RVCManagerRequirements |
|
Account Manager |
RVCManagerAccount |
|
Department |
RVCProcessorDepartment |
|
Supplier |
RVCProcessorSupplier |
|
Customer |
RVCProcessorCustomer |
|
|
Note
|
The assigned role collection determines which views and information you can receive about a project. |
To collaborate between the project manager and processors of department, supplier and customer to evaluate the requirements and validate the results, the requirements are shared. But not only the requirement to be evaluated itself is shared. The requirements in the hierarchy above are shared as well as they may contain information required for evaluation. As you can see on this picture, the requirements are shared as follows.
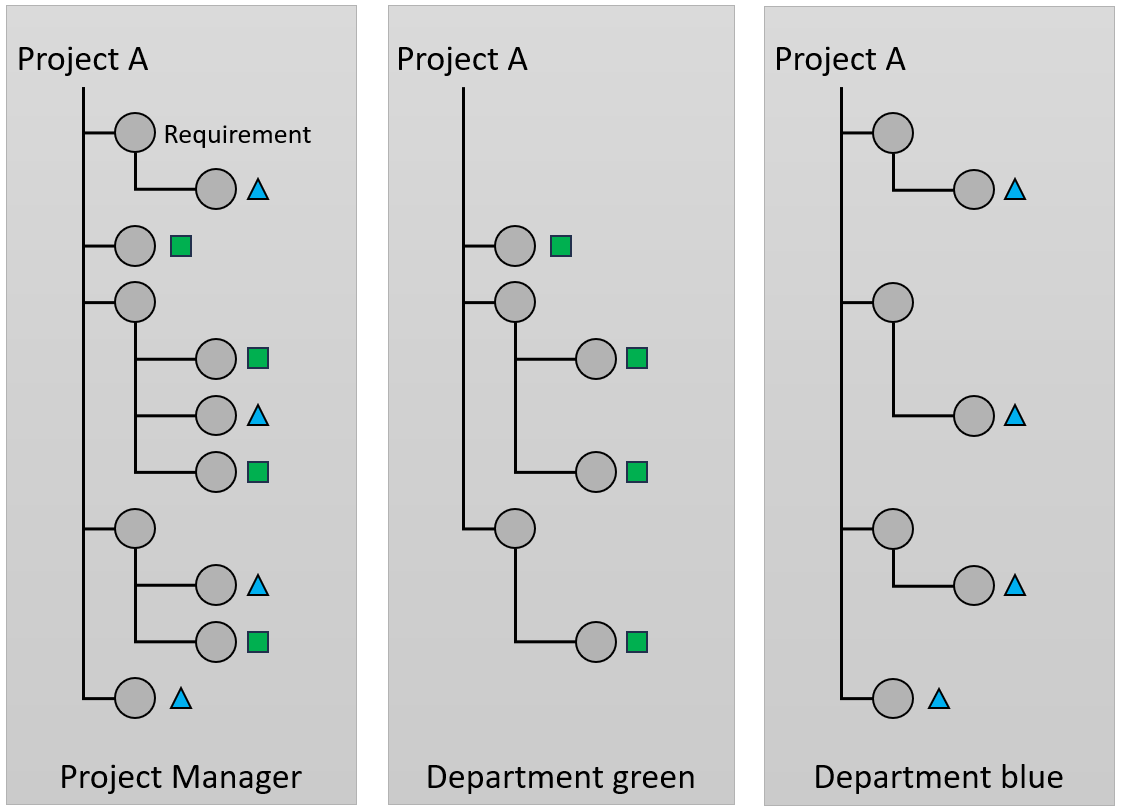
Internal users with role RVCManagerProject see all leaf-requirements and share leaf-requirements for evaluation with the responsible Department. Internal users with role RVCProcessorDepartment see only assigned leaf-requirements and share leaf-requirements for evaluation with the responsible Supplier or for clarification or approval with the Customer. External users with role RVCProcessorSupplier see only assigned leaf-requirements and share leaf-requirements for clarification or approval with the Customer.
The following illustration shows the three views within the RVC Cockpit app which is available for internal users with the roles RVCManagerAccount, RVCManagerProject, RVCManagerRequirements or RVCProcessorDepartment.
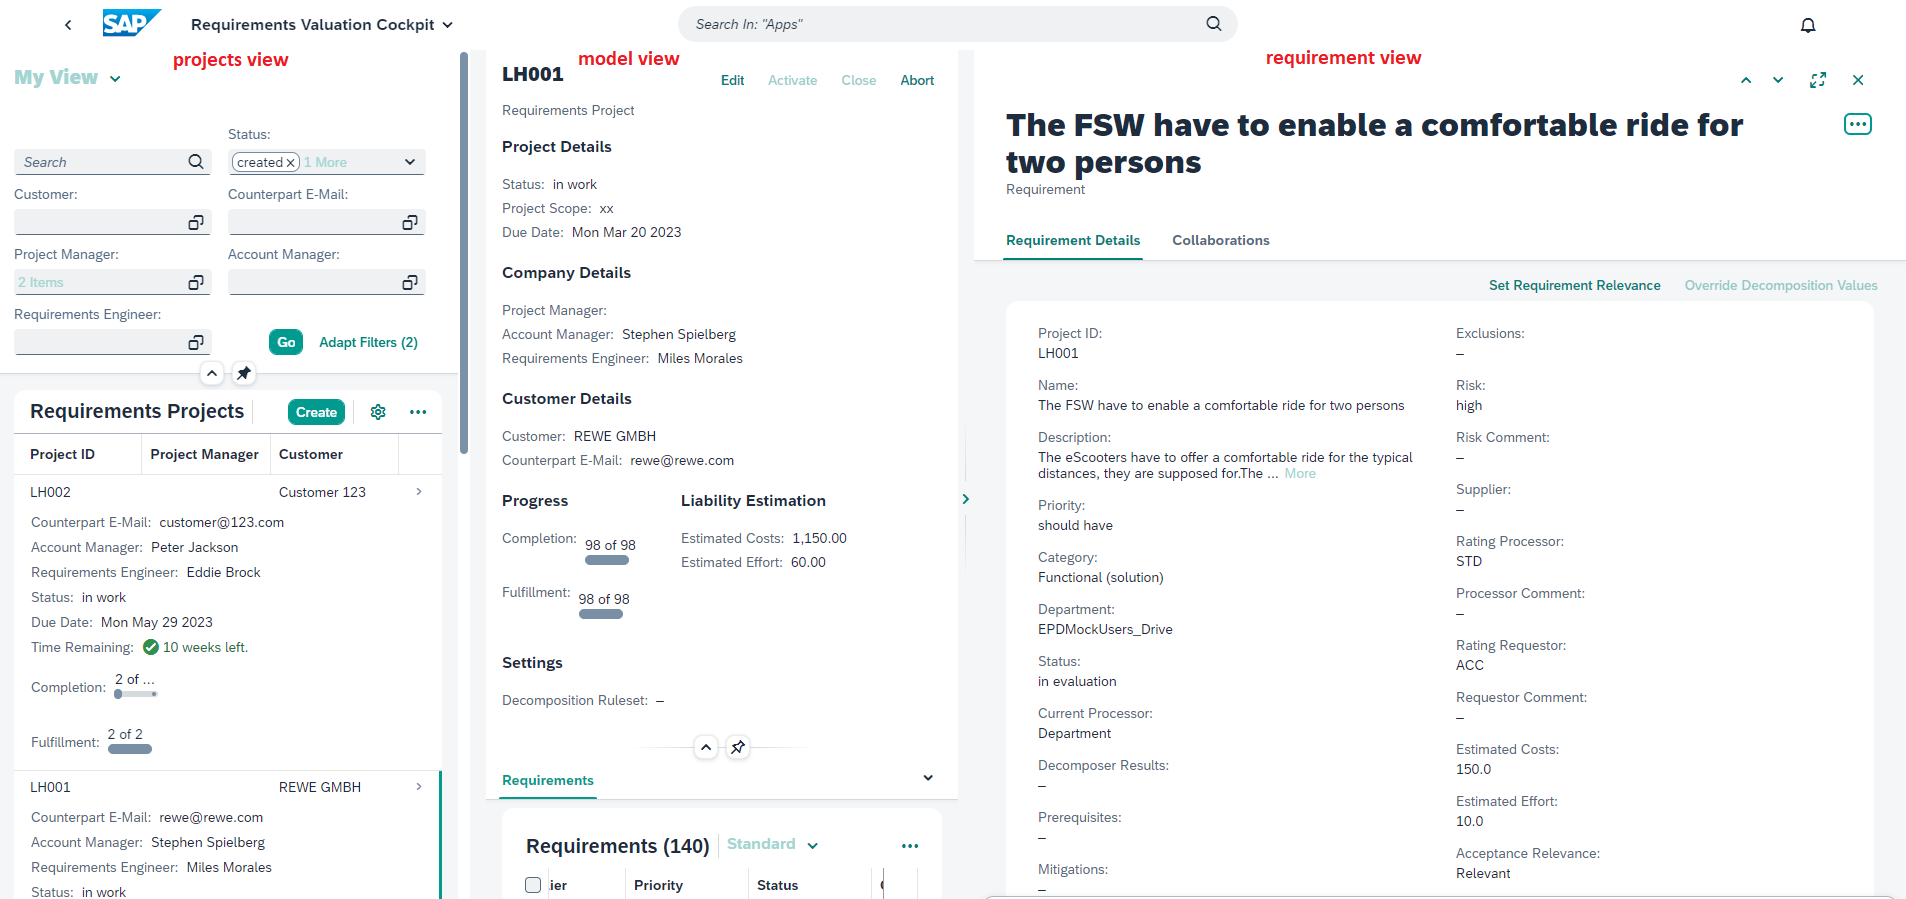
The projects view on the left side displays the projects according to the configured filters and according to your role. The model view in the center displays details and all the requirements of the project selected in the projects view. The requirement view in the rights shows the details of the requirement selected in the model view.
As an internal user with role RVCManagerProject, RVCManagerRequriements or RVCManagerAccount you can see all projects. As an internal user with role RVCManagerProject, RVCManagerRequriements or RVCManagerAccount you can see all requirements of a project. As an internal user with role RVCProcessorDepartment you can only see the projects which contain requirements assigned to your department. As an internal user with role RVCProcessorDepartment you can only see the requirements which are assigned to your department and the non leaf-requirements above to may get information about the context of the requirement.
For external users with role RVCProcessorSupplier RVC Evaluator for Supplier app is provided which can be accessed from the My Collaborations app. The following illustration shows the three views within RVC Evaluator for Supplier app.

The collaboration view on the left side displays the collaboration which you have selected in My Collaborations app. The model view in the center displays details and all the requirements of the project referenced by the collaboration selected in the collaborations view. The requirement view in the right shows the details of the requirement selected in the model view.
As an external user with role RVCProcessorSupplier you can only see the collaborations which are created for you and which contain requirements assigned to you. As an external user with role RVCProcessorSupplier you can only see the requirements which are assigned to you and the non leaf-requirements above to may get information about the context of the requirement.
For external users with role RVCProcessorCustomer RVC Evaluator for Customer app is provided which can be accessed from the My Collaborations app. The following illustration shows the three views within RVC Evaluator for Customer app.

The collaboration view on the left side displays the collaboration which you have selected in My Collaborations app. The model view in the center displays details and all the requirements of the project referenced by the collaboration selected in the collaborations view. The requirement view in the right shows the details of the requirement selected in the model view.
As an external user with role RVCProcessorCustomer you can only see the collaborations which are created for you and which contain requirements assigned to you. As an external user with role RVCProcessorCustomer you will only see the requirements which are assigned to you.
1.1. How to use the project view in RVC Cockpit?
The following image shows the project view of the RVC Cockpit app.
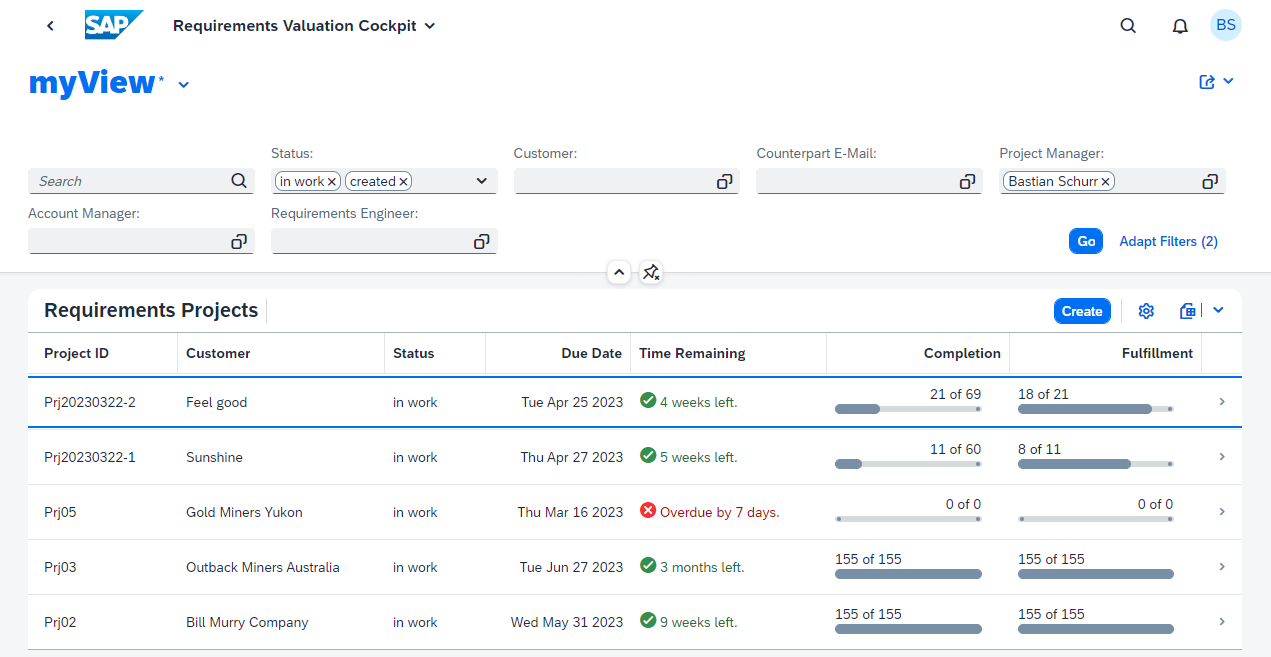
Using the header menu at the top, you can use filters and search function to display the right projects in the table. The values for the columns time remaining, completion and fulfillment are calculated automatically.
| Column | Description |
|---|---|
Time Remaining |
Indicates the time remaining until the deadline of the project. |
Completion |
Indicates the number of evaluated leaf-requirements in property rating processor. This means that all leaf-requirements which have a value in the property rating processor are counted, as they have been evaluated. |
Fulfillment |
Indicates the number of fulfilled leaf-requirements in property rating processor. This means all leaf-requirements which have the value standard or modification in the property rating processor are counted as they can be implemented. |
For a project the following status model applies:

The status created is set after a user with the role RVCManagerProject has created a project. The following table describes which user actions are available depending on status and role.
| Project Status | Role | User Action | Next Status |
|---|---|---|---|
created |
RVCManagerProject |
|
|
in work |
|
|
|
completed |
|
|
|
closed |
RVCManagerProject |
||
aborted |
RVCManagerProject |
Prerequisites
-
Role RVCManagerProject, RVCManagerRequirements, RVCManagerAccount or RVCProcessorDepartment is assigned to your user.
-
You can access RVC Cockpit app from the SAP Fiori Launchpad.
Quick Steps
1.1.1. How to adapt filters for the project table?
This section describes the steps to adapt the filters displayed for the project table.
Prerequisites
Procedure
-
Click on Adapt Filters.
-
Change the order or deselect fields which are not needed.
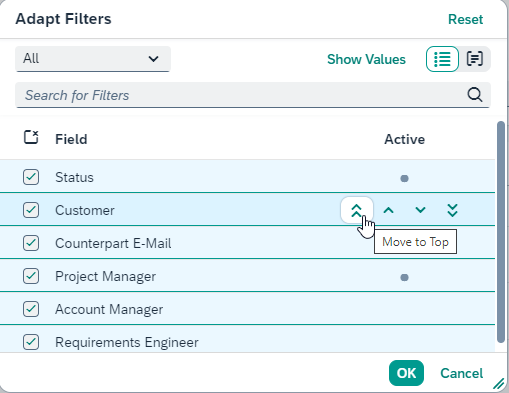 Illustration 8. RVC Cockpit app projects view - adapt filters
 -
Confirm with OK.
Result
The filters on top of the projects view of RVC Cockpit app are adapted.
Next Steps
1.1.2. How to configure individual filtering for the project table?
This section describes the steps to configure filters for the project table individually.
Prerequisites
Procedure
-
Configure the filters as needed.
-
Click on Go to execute the filters.
Result
The project table displays only those projects which match the configured filters.
Next Steps
1.1.3. How to configure individual view for the project table?
This section describes the steps to configure the columns for the project table individually.
Prerequisites
Procedure
-
Click on the Settings icon.
-
Change the order, deselect or select columns.
-
Confirm with OK.
Result
The project table displays only the configured columns.
Next Steps
1.1.4. How to store individual configuration for the project table?
This section describes the steps to store the individual filters and columns for the project table to quickly display projects according to your needs.
Prerequisites
Procedure
-
Click on Select View.
-
Click on Manage to save the current configuration in an existing view.
or alternatively:
-
Click on Save As to save the current configuration as a new view.
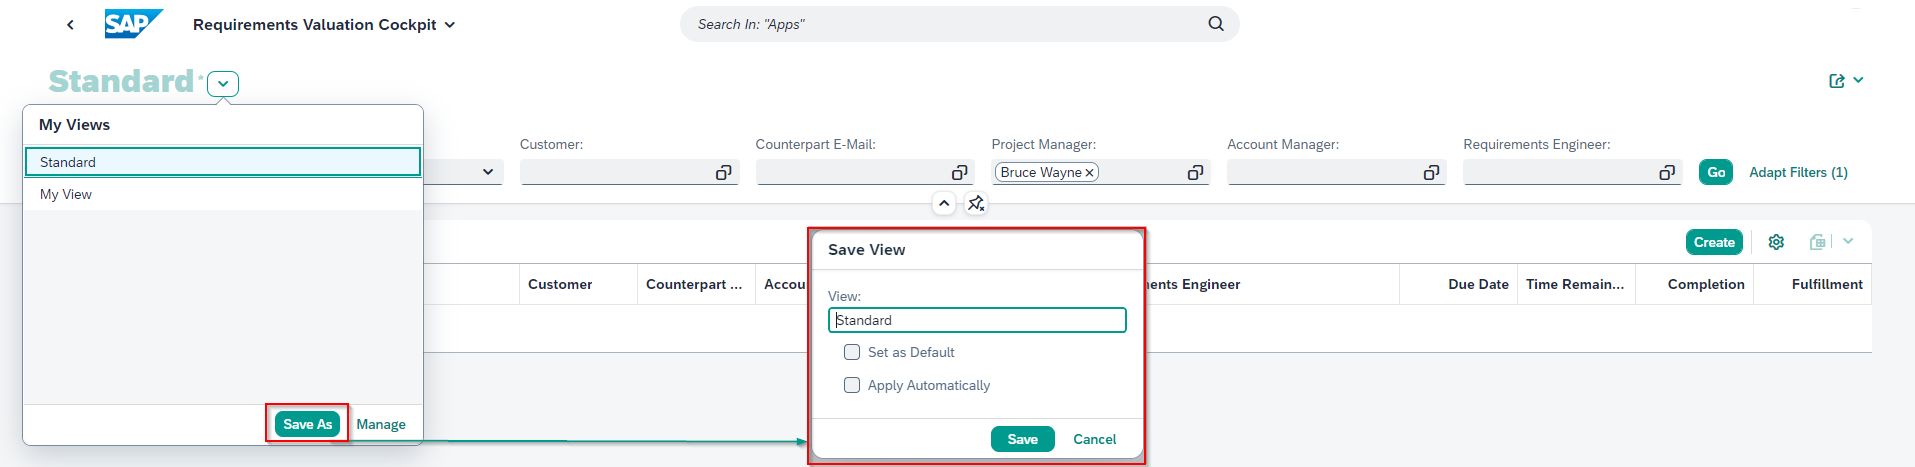 Illustration 9. RVC Cockpit app - store view
 -
Enter the displayed name.
-
Optionally mark Set as Default to directly take this filter after loading RVC Cockpit app.
-
Optionally mark Apply Automatically to directly refresh the project table after loading RVC Cockpit app.
-
Confirm with Save.
Result
The configured view is stored for the current user and can be reused next time RVC Cockpit app is started.
Next Steps
-
1.1.5. How to export the current table to an external file?
This section describes the steps to export the data displayed in the table to an external file format on your local PC.
Prerequisites
Procedure
-
Select the Export Table at the top right of the table.
 Illustration 10. RVC Cockpit app projects view - export
 -
Select Export to create a file in xlsx format.
or alternatively:
-
Select Export As…, select the file format and put in the file name.
Result
A file containing the displayed data from the table is stored in the selected format and directory on your local PC.
Next Steps
-
1.1.6. How to share the link on the current tile?
This section describes the steps to share the current app with your colleagues.
Prerequisites
Procedure
-
Select Share at the top right of the window.
 Illustration 11. RVC Cockpit app projects view - share
 -
Select Send E-Mail. A new email message opens containing a link to RVC Cockpit app.
-
Enter an email address and write a message.
-
Select Send.
Result
The receiver of the email will get the link to RVC Cockpit app.
Next Steps
-
1.1.7. How to create a new project?
This section describes the steps to create a new project.
Prerequisites
-
Role RVCManagerProject is assigned to your user.
-
You can access RVC Cockpit app from the SAP Fiori Launchpad.
Procedure
-
Click on Create.
-
Enter the unique Project ID for identification.
-
Select the Account Manager and the Requirement Engineer.
-
Enter the Customer, Counterpart E-Mail and Due Date.
-
Optionally, describe the project scope and choose a predefined rule set.
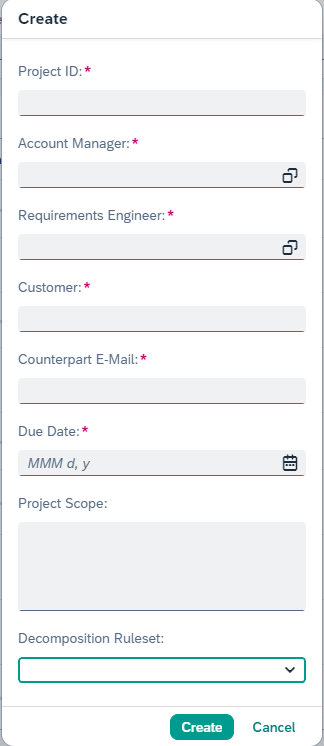 Illustration 12. RVC Cockpit app - create a new projectNote
If no predefined rule set is chosen, the initial configured rule set (@all) will be used for the decomposing process. If a predefined rule set is chosen, this specified rule set will be used for the decomposing process.
-
Confirm with Create.
Result
The project is now in the status created.
|
Note
|
Projects in the status created are only visible/editable for users with the role RVCManagerProject. |
Next Steps
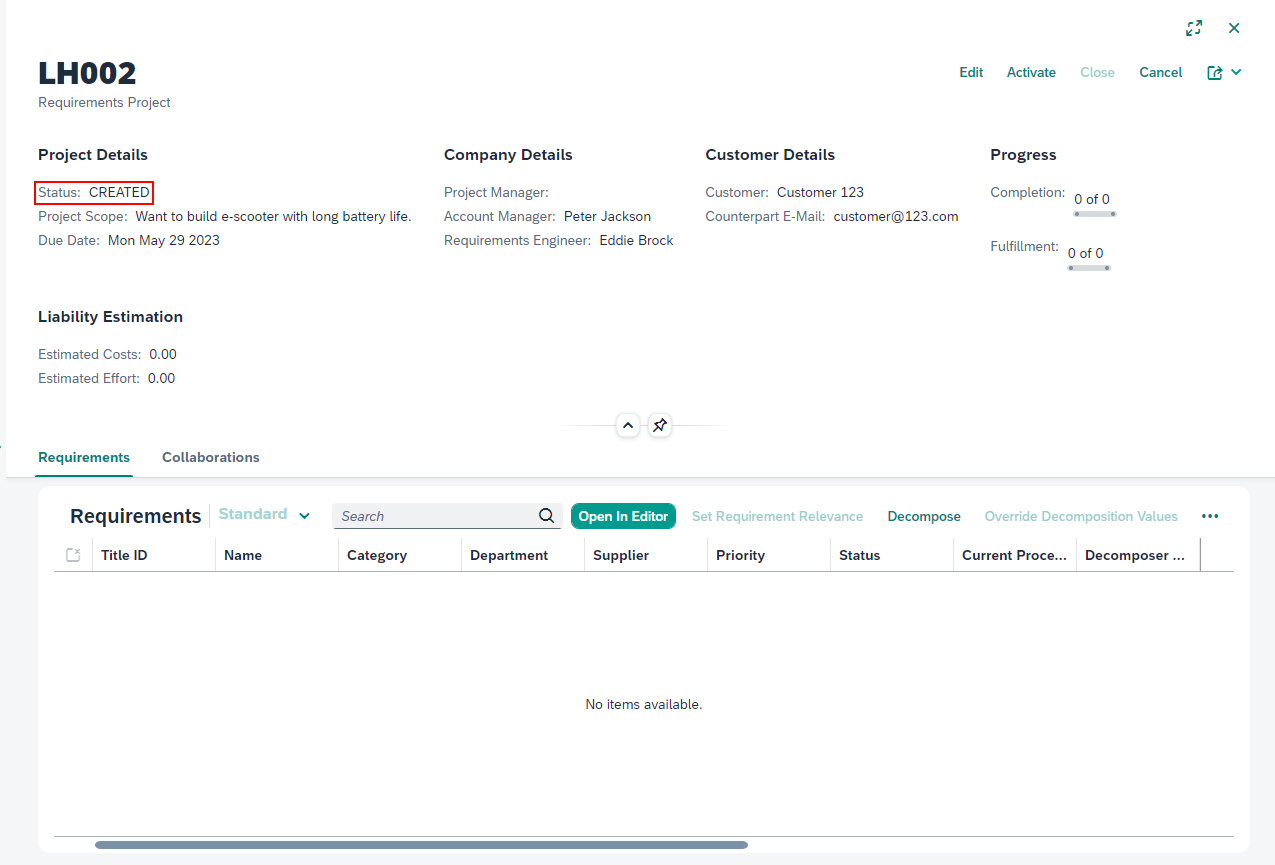
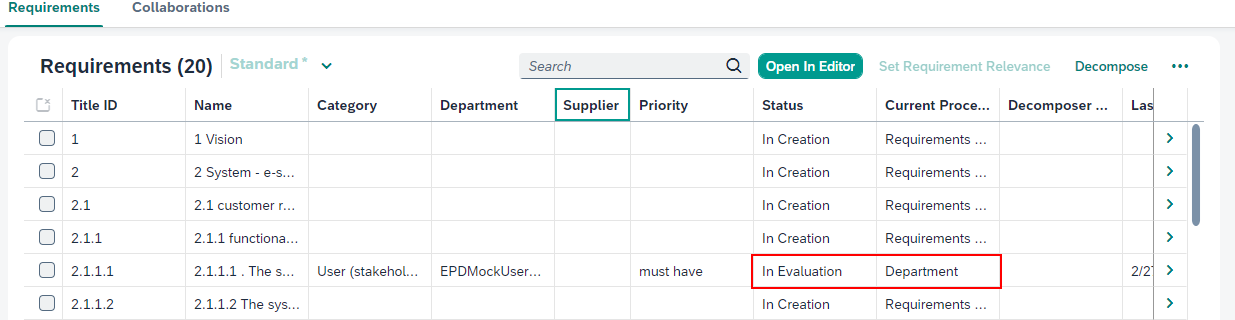
1.2. How to use the requirement model view in RVC Cockpit?
The following image shows the model view of the RVC Cockpit app.

On top of the page the project properties are displayed. Below in the card Requirements the requirements of the project are listed. The card Collaborations lists the collaborations of this project which are created to share requirements with suppliers or the customer. For a requirement the following status model applies:

The status in creation is set after a user with role RVCManagerRequirements has imported the requirements. The following table describes which user actions are available depending on status and role.
| Requirement Status | Current Processor | User Action | Next Status | Next Processor |
|---|---|---|---|---|
in creation |
RVCManagerRequirements |
|
decomposed |
RVCManagerProject |
decomposed |
RVCManagerProject |
|
in evaluation |
RVCProcessorDepartment |
in evaluation |
RVCProcessorDepartment |
share the requirements with the supplier |
in evaluation |
RVCProcessorSupplier |
approve through the customer |
in evaluation |
RVCProcessorCustomer |
||
clarify through the customer |
in clarification |
RVCProcessorCustomer |
||
evaluate and submit the evaluation of the requirements |
in validation |
RVCManagerProject |
||
RVCProcessorSupplier |
clarify through the customer |
in clarification |
RVCProcessorCustomer |
|
evaluate the requirement |
in evaluation |
RVCProcessorDepartment |
||
RVCProcessorCustomer |
approve or reject the evaluation of the requirement |
in evaluation |
RVCProcessorDepartment |
|
in clarification |
RVCProcessorCustomer |
|
back in the same status before clarification |
back at the same persona before clarification |
in validation |
RVCManagerProject |
approve the evaluation of the requirement |
validated |
RVCManagerProject |
reject the evaluation of the requirement |
in evaluation |
RVCProcessorDepartment |
||
validated |
RVCManagerProject |
approve all evaluated leaf-requirements |
project status will automatically change to completed |
Prerequisites
-
Role RVCManagerProject, RVCManagerRequirements, RVCManagerAccount or RVCProcessorDepartment is assigned to your user.
-
You can access RVC Cockpit app from the SAP Fiori Launchpad.
-
You have selected one project in the project view of RVC Cockpit app.
Quick Steps
1.2.1. How to edit the header properties of a project?
This section describes the steps to edit the header properties of a project.
Prerequisites
-
Role RVCManagerProject is assigned to your user.
-
You can access RVC Cockpit app from the SAP Fiori Launchpad.
-
You have selected one project in the project view of RVC Cockpit app.
Procedure
-
Click on Edit on top.
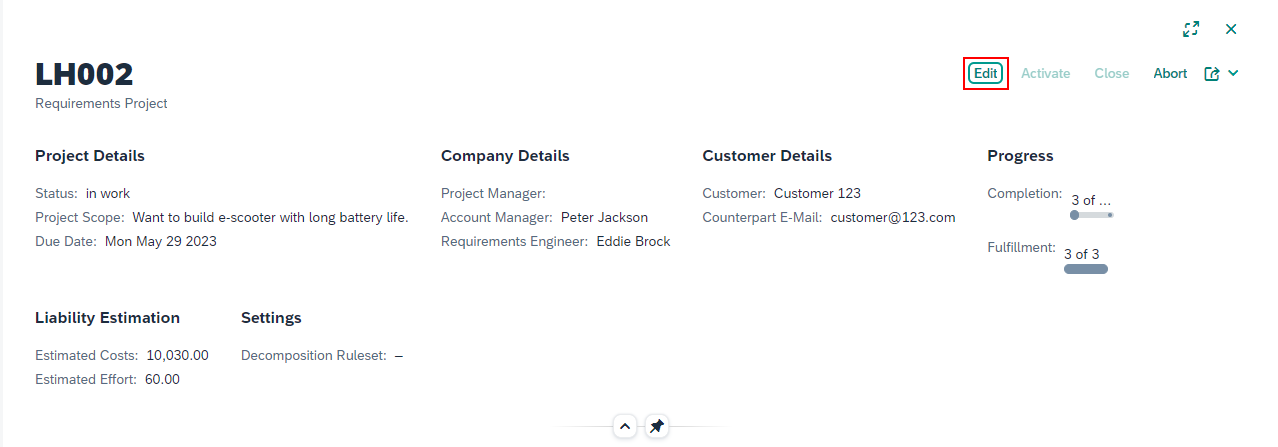 Illustration 16. RVC Cockpit app model view - edit project header properties
 -
Edit the values.
-
Confirm with Save.
Results
Changes are visible in the header of the project.
Next Steps
-
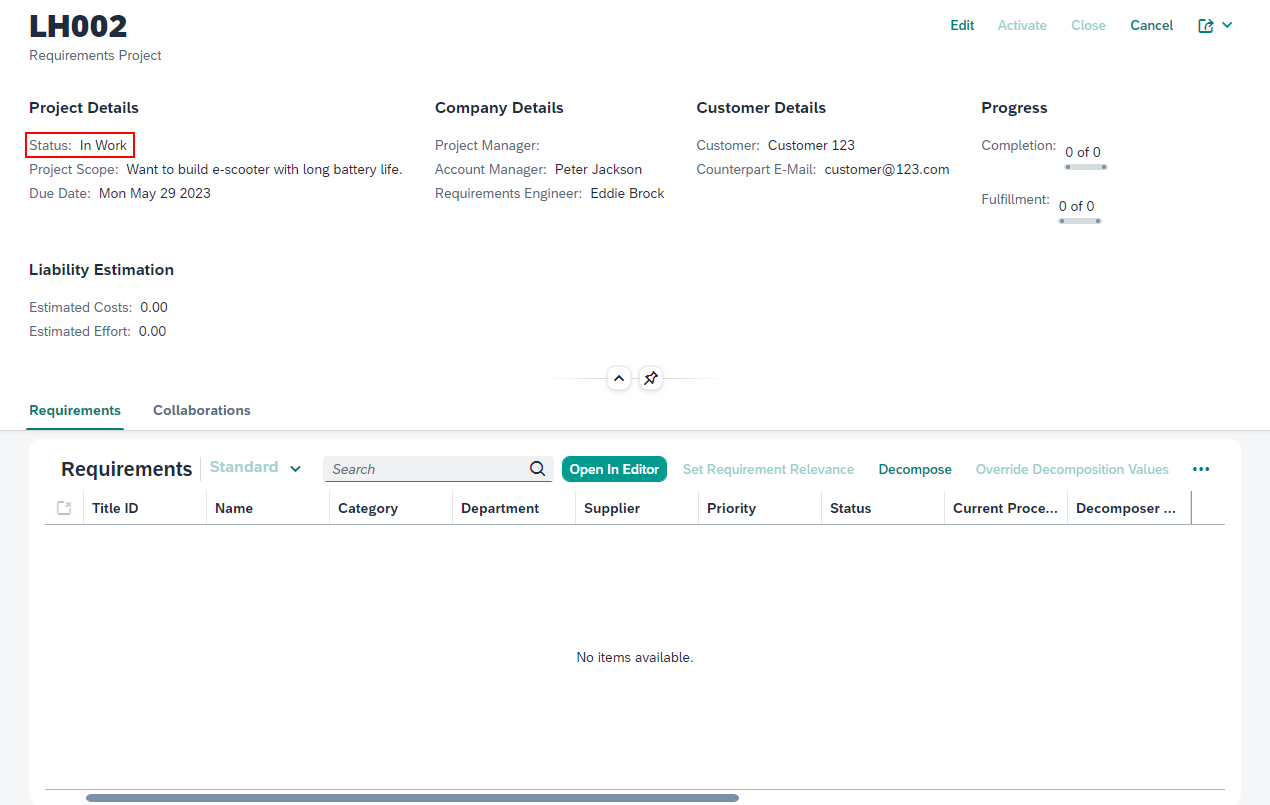
1.2.2. How to activate a project?
This section describes the steps to activate a project.
Prerequisites
-
Role RVCManagerProject is assigned to your user.
-
You can access RVC Cockpit app from the SAP Fiori Launchpad.
-
You have selected one project in the project view of RVC Cockpit app.
Procedure
-
Click on Activate on top.
-
Confirm with OK.
Result
The status of the project changed to in work, now users with role RVCManagerRequirements can see and work on the project.
Next Steps
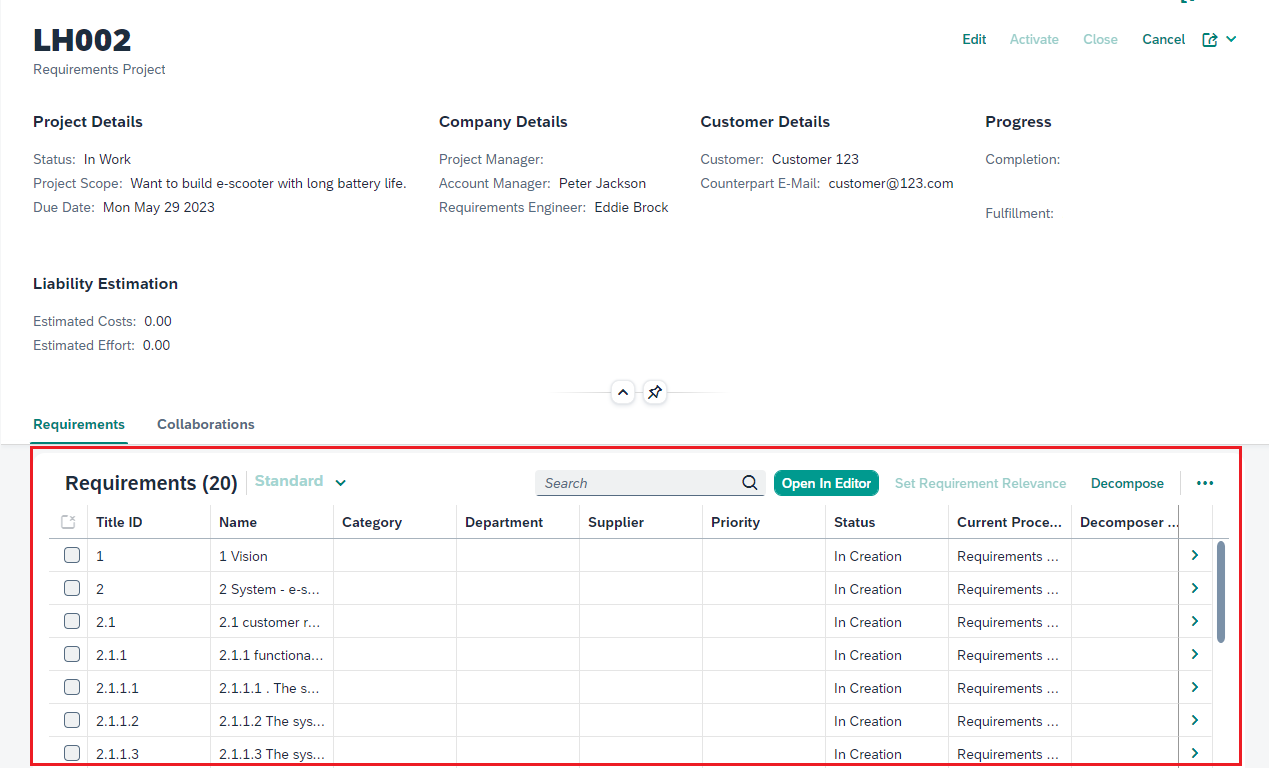
1.2.3. How to import requirements?
This section describes the steps to import and edit requirements.
Prerequisites
-
Role RVCManagerRequirements is assigned to your user.
-
You can access RVC Cockpit app from the SAP Fiori Launchpad.
-
You have selected one project in the project view of RVC Cockpit app.
Procedure
-
Click on Open In Editor to open Requirements Management and Systems Modeling app of SAP EPD in a separate tab.
-
For requirements delivered within a ReqIF file follow the steps in Importing Requirements from a ReqIF File
-
For requirements delivered within a MS Word file follow the steps in Importing Requirements from a Word Document
-
Optionally: Add additional requirements if needed.
-
Click on Save to save the requirements model.
-
-
Change back to the tab containing the RVC Cockpit app model view.
-
Click on Go to display the imported requirements in the table.
Result
The requirements are listed in requirements table in the model view of the RVC Cockpit app. Every requirement is automatically in the status in creation. The current processor is the Requirement Engineer.
Next Steps
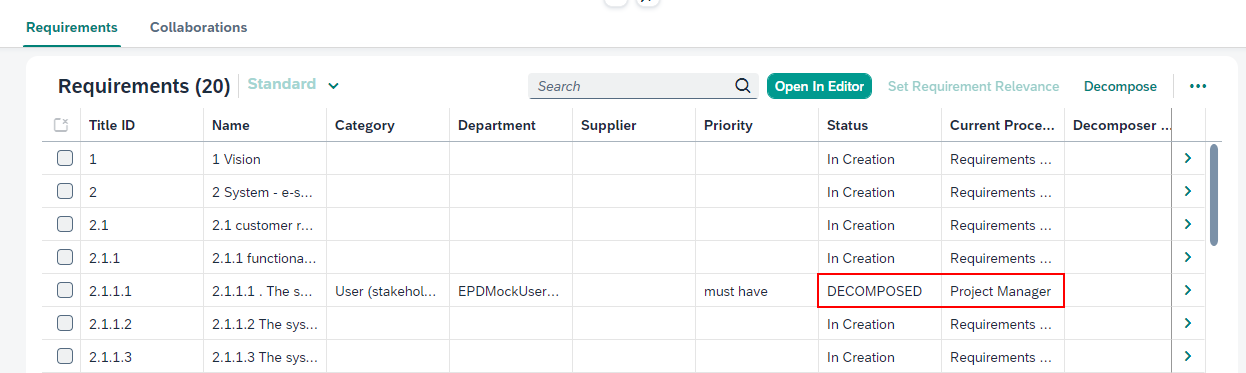
1.2.4. How to decompose requirements?
This section describes the steps to decompose requirements.
The decomposing process analyzes the title and description of the requirement according to the configured rules of a rule set. The defined keywords in the rules are compared with the title and description. If there is a match the defined property - Category, Department or Priority - of the rule, the specified value is automatically set for the property.
|
Note
|
Only leaf-requirements are affected when selected for decomposing. A leaf-requirement is a requirement, which does not have any children in the hierarchy. |
Prerequisites
-
Role RVCManagerRequirements is assigned to your user.
-
You can access RVC Cockpit app from the SAP Fiori Launchpad.
-
You have selected one project in the project view of RVC Cockpit app.
-
The project contains requirements.
Procedure
-
Select the leaf-requirements you want to decompose.
-
Click on Decompose.
-
Click on Go to update the requirements in the table.
Result
The requirement has the status decomposed. The columns Category, Department, and Priority contain values. Furthermore a timestamp in the column Last Decomposed On appears.
|
Note
|
If there are multiple matches or any error, theses will be listed in the column Decomposer Results. In this case you have to check the rule sets and decompose again, or change the values manually. |

Next Steps
1.2.5. How to change the decomposition result of a requirement?
This section describes the steps to change the decomposer results of a requirement before completing the the decomposition.
Prerequisites
-
Role RVCManagerRequirements is assigned to your user.
-
You can access RVC Cockpit app from the SAP Fiori Launchpad.
-
You have selected one project in the project view of RVC Cockpit app.
-
The project is in status in work.
-
The project already contains requirements.
Procedure
-
Decompose the requirements again, for instance due to structural changes. Refer How to decompose requirements?.
or alternatively:
-
Click on Open In Editor to open Requirements Management and Systems Modeling app of SAP EPD in a separate tab.
-
Navigate to the requirement.
-
Change the values manually.
-
Click on Save to save the requirements model.
-
-
Change back to the tab containing the RVC Cockpit app model view.
-
Click on Go to update the requirements in the table.
Result
The timestamp in the column Last Decomposed On and the changed values will change on the overview. The requirement still has the status decomposed.
Next Steps
1.2.6. How to complete the decomposition of a requirement?
This section describes the steps to complete the decomposition of a requirement. When all properties are filled to a satisfactory level, the decomposition can be completed.
Prerequisites
-
Role RVCManagerRequirements is assigned to your user.
-
You can access RVC Cockpit app from the SAP Fiori Launchpad.
-
You have selected one project in the project view of RVC Cockpit app.
-
The project is in status in work.
-
The project already contains requirements.
-
The requirement has a value in the column last decomposed on.
Procedure
-
Select the decomposed requirement.
-
Click on Complete Decomposition.
Result
The status of the requirement is still decomposed, but the current processor is now the Project Manager.
Next Steps
1.2.7. How to override decomposition values?
This sections describes the steps to override decomposition values. It is the project manager’s task to check the decomposed requirements and adjust them if necessary.
Prerequisites
-
Role RVCManagerProject is assigned to your user.
-
Role RVCManagerRequirements is assigned to your user.
-
You can access RVC Cockpit app from the SAP Fiori Launchpad.
-
You have selected one project in the project view of RVC Cockpit app.
-
The project is in status in work.
-
The project contains at least one requirement in status decomposed.
Procedure
-
Select a requirement in status decomposed.
-
Click on Override Decomposition Values.
-
Change the values.
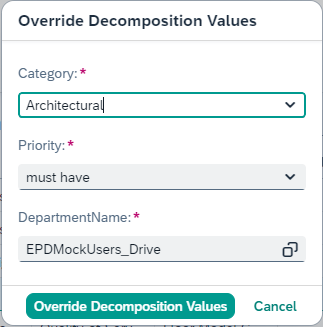 Illustration 21. RVC Cockpit app model view - override decomposition values
 -
Confirm with Save.
Result
The values are changed accordingly.
Next Steps
1.2.8. How to set the relevance for a requirement?
This section describes the steps to set the relevance for a requirement. The relevance information is helpful to prioritize the requirements.
Prerequisites
-
Role RVCManagerProject is assigned to your user.
-
You can access RVC Cockpit app from the SAP Fiori Launchpad.
-
You have selected one project in the project view of RVC Cockpit app.
-
The project is in status in work.
-
The project already contains requirements.
Procedure
-
Select the requirement you want to edit.
-
Click on Set Requirement Relevance.
-
Choose relevant or irrelevant for Acceptance Relevance.
-
Choose relevant or irrelevant for Contract Relevance.
-
Confirm with Save.
-
Click on Go to update the requirements in the table.
Next Steps
1.2.9. How to share a requirement?
This section describes the steps to share a requirement with a department.
Prerequisites
-
Role RVCManagerProject is assigned to your user.
-
You can access RVC Cockpit app from the SAP Fiori Launchpad.
-
You have selected one project in the project view of RVC Cockpit app.
-
You have at least one requirement in status decomposed.
Procedure
-
Check if the specified department is correct.
-
Select the requirement you want to share.
-
Click on Share.
-
Select Evaluate through Colleagues.
-
Confirm with OK.
-
Click on Go to update the requirements in the table.
Result
The status changes to in evaluation. The current processor is the Department. The assigned department will receive an email with a link to the requirement for evaluation.
Next Steps
1.2.10. How to abort a project?
This section describes the steps to abort a project.
Prerequisites
-
Role RVCManagerProject is assigned to your user.
-
You can access RVC Cockpit app from the SAP Fiori Launchpad.
-
You have selected one project in the project view of RVC Cockpit app.
Procedure
-
Click on Abort on top.
NoteIf a project is once in the status aborted, it is not possible to change this status.
Result
The status of the project will change to aborted. Only users with role RVCManagerProject can see the project.
Next Steps
-
1.2.11. How to complete a project?
This section describes the steps to complete a project. A project is complete if all leaf-requirements have reached the status validated.
Prerequisites
-
Role RVCManagerProject is assigned to your user.
-
You can access RVC Cockpit app from the SAP Fiori Launchpad.
-
You have selected one project in the project view of RVC Cockpit app.
-
The project is in status in work.
-
All leaf-requirements are in the status validated.
Procedure
-
The last leaf-requirement has to be validated from a user with role RVCManagerProject.
-
Click on Go to update the requirements in the table.
Result
The status of the project automatically change to completed. Users with role RVCProcessorDepartment, RVCProcessorSupplier or RVCProcessorCustomer will no longer be able to see the project. And none of the other roles can continue to work on the project.
Next steps
1.2.12. How to close a project?
This section describes the steps to close a project.
Prerequisites
-
Role RVCManagerProject is assigned to your user.
-
You can access RVC Cockpit app from the SAP Fiori Launchpad.
-
You have selected one project in the project view of RVC Cockpit app.
-
The project is in status completed.
Procedure
-
Click on Close on top.
NoteIf a project is once in the status closed, it is not possible to change this status.
Result
The status of the project will change to closed. Only users with role RVCManagerProject or RVCManagerAccount can see the project.
Next Steps
-
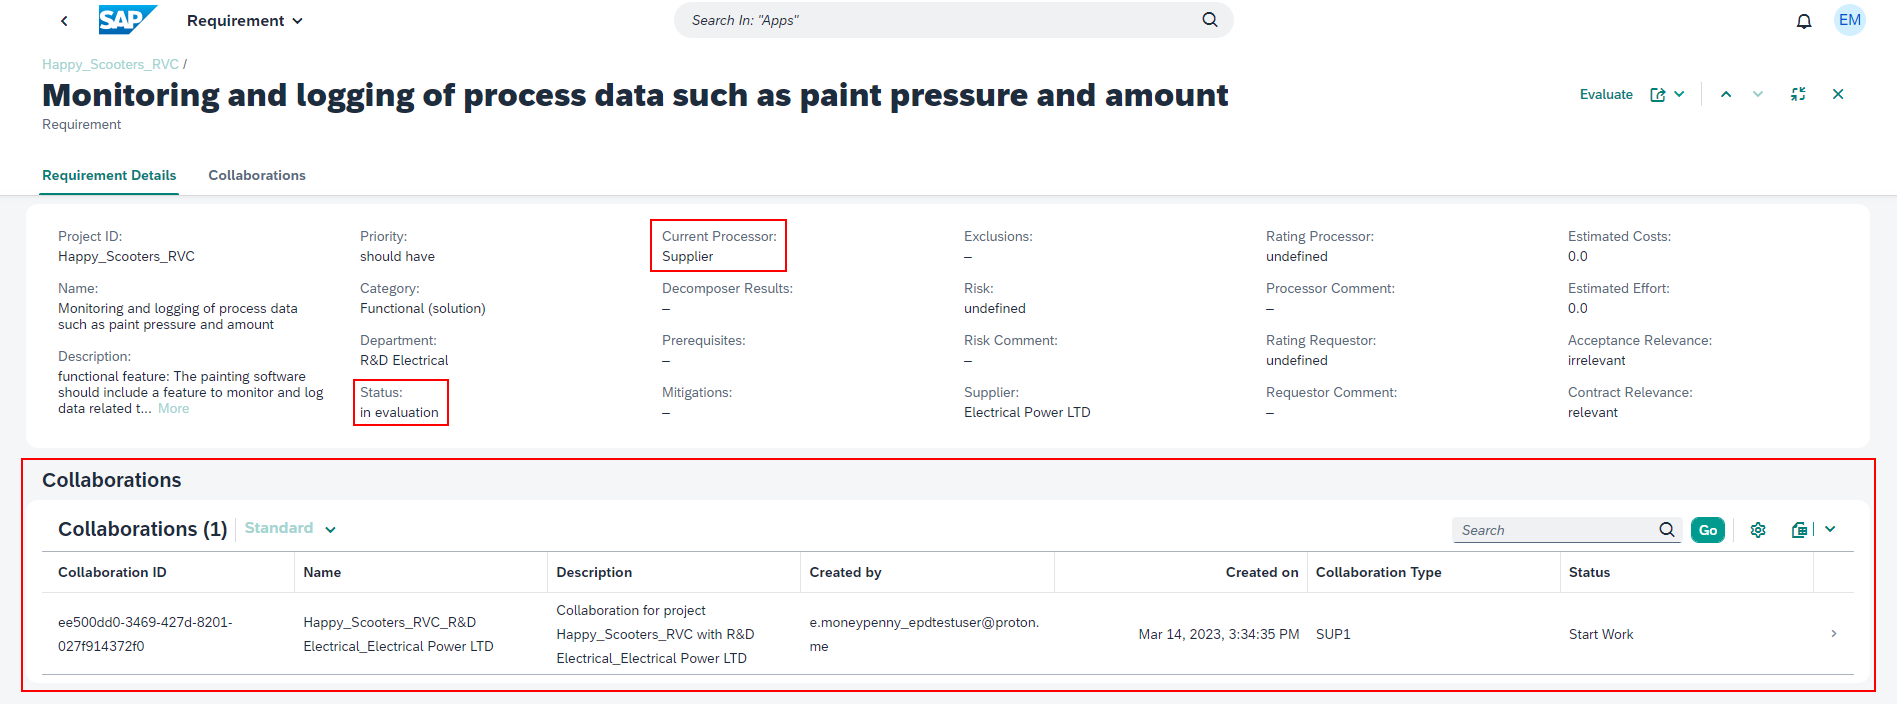
1.3. How to use the requirement view in RVC Cockpit?
This section describes the usage of the requirement view in RVC Cockpit app. The illustration below shows the requirement view in RVC Cockpit app.
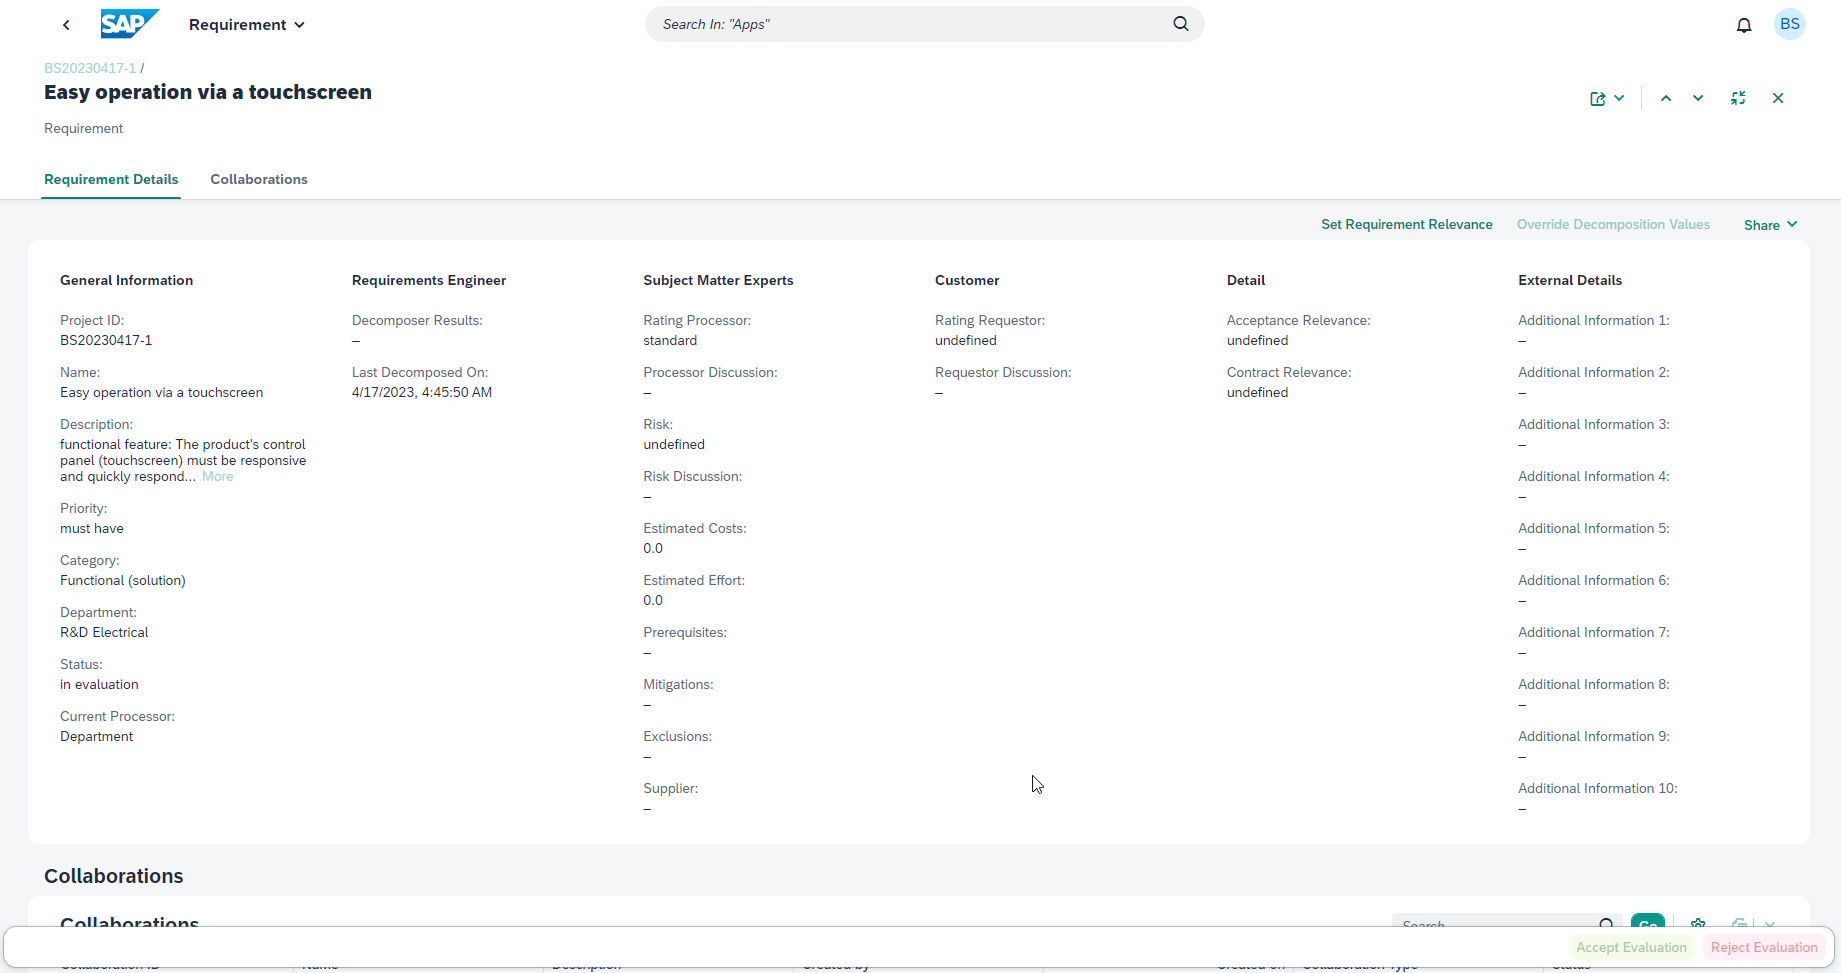
Users with role RVCManagerProject, RVCManagerRequirements, RVCManagerAccount or RVCProcessorDepartment can use the requirements view to get detailed information about a single requirement. Users with role RVCProcessorDepartment use the requirement view to work on their tasks:
| Action | Context | Next Step | Next Status |
|---|---|---|---|
evaluate by department |
requirement is clear, department evaluates the requirement |
in evaluation |
|
evaluate by supplier |
requirement is solved by a supplier, supplier will evaluate the requirement |
in evaluation |
|
clarify by the customer |
additional information of the customer is needed, customer will clarify the description of the requirement |
in clarification |
|
approve/reject by the customer |
approval of the customer is needed, customer will approve or reject the evaluation of the requirement |
in evaluation |
Prerequisites
-
Role RVCManagerProject, RVCManagerRequirements, RVCManagerAccount or RVCProcessorDepartment is assigned to your user.
-
You can access RVC Cockpit app from the SAP Fiori Launchpad.
-
You have selected one project in the project view of RVC Cockpit app.
-
You have selected one requirement in the model view of RVC Cockpit app.
Quick Steps
1.3.1. How to clarify a requirement through the customer?
This sections describes the steps to share the requirement for clarification by the customer. In case the description of the requirement is unclear the customer needs to clarify the description of the requirement.
Prerequisites
-
Role RVCProcessorDepartment is assigned to your user.
-
You can access RVC Cockpit app from the SAP Fiori Launchpad.
-
You have selected one project in the project view of RVC Cockpit app.
-
You have selected one requirement in the model view of RVC Cockpit app.
Procedure
-
Click on Share and Clarify through Customer.
Result
The status changes to in clarification and the Current Processor is now the Customer. The customer will receive an information.
Next Steps
1.3.2. How to share a requirement with the supplier?
This section describes the steps to share a requirement for evaluation with the supplier.
Prerequisites
-
Role RVCProcessorDepartment is assigned to your user.
-
You can access RVC Cockpit app from the SAP Fiori Launchpad.
-
You have selected one project in the project view of RVC Cockpit app.
-
You have selected one requirement in the model view of RVC Cockpit app.
Procedure
-
Click on Share and Evaluate through supplier.
-
Select the supplier.
-
Confirm with OK.
Result
The status is still in evaluation but the Current Processor is now the Supplier. A Collaboration is generated and is displayed in the Collabortions card. The supplier receive the information via email, and gets access to the collaboration.
Next Steps
1.3.3. How to evaluate a requirement?
This section describes the steps to evaluate a requirement.
Prerequisites
-
Role RVCProcessorDepartment is assigned to your user.
-
You can access RVC Cockpit app from the SAP Fiori Launchpad.
-
You have selected one project in the project view of RVC Cockpit app.
-
You have selected one requirement in the model view of RVC Cockpit app.
Procedure
-
Select the requirement.
-
Click the Evaluate button.
-
Evaluate the requirement with the help of the following table:
Rating Processor Description standard
The requirement can be implemented according to its description.
modification
The requirement is possible to implement with some restrictions and/or modification. In this case estimated costs and estimated effort should be filled out as well.
unfeasible
The requirement is not possible to implement. It is possible to discuss an alternative solution with the customer, which the customer can agree to. If the alternative solution is accepted by the customer the rating processor must be changed to either standard or modification depending on the solution. If the alternative solution is not accepted the rating processor remains on unfeasible.
-
According to the rating fill out the risk and the risk comment.
-
According to the rating fill out estimated costs and effort:
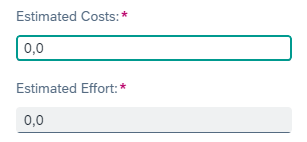 Illustration 25. RVC - evaluation of estimated costs and effortNote
Consider that units of currency and time are defined in the project properties.
-
According to the rating fill out prerequisites, exclusion and mitigation.
-
Click the Evaluate button.
Result
The values set in the evaluator are stored in the requirement.
Next Steps
1.3.4. How to approve a requirement through the customer?
This section describes the steps to share a requirement for approval with the customer. In case the requirement is rated with unfeasible and an alternative solution is provided the customer needs to approve the alternative solution.
Prerequisites
-
Role RVCProcessorDepartment is assigned to your user.
-
You can access RVC Cockpit app from the SAP Fiori Launchpad.
-
You have selected one project in the project view of RVC Cockpit app.
-
You have selected one requirement in the model view of RVC Cockpit app.
-
The requirement is evaluated.
Procedure
-
Check the requirement details.
-
Click on Share and Approve through Customer.
Result
The status is still in evaluation but the Current Processor is now the Customer. The customer will receive an information.
Next Steps
1.3.5. How to submit the evaluation of a requirement?
This section describes the steps to submit the evaluation of a requirement.
Prerequisites
-
Role RVCProcessorDepartment is assigned to your user.
-
You can access RVC Cockpit app from the SAP Fiori Launchpad.
-
You have selected one project in the project view of RVC Cockpit app.
-
You have selected one requirement in the model view of RVC Cockpit app.
-
The requirement is in status in evaluation and is evaluated.
Procedure
-
Check the requirement details.
-
Click on Submit Evaluation.
NoteDo not submit the evaluation before finishing with the work! If the evaluation of the requirement is submitted you can no longer work on the requirement.
Result
The status changes to in validation and the current processor is the one with the role RVCManagerProject. The department has no longer the possibility to work on the requirement.
Next Steps
1.3.6. How to validate a requirement?
This section describes the steps to validate the evaluation of a requirement.
Prerequisites
-
Role RVCManagerProject is assigned to your user.
-
You can access RVC Cockpit app from the SAP Fiori Launchpad.
-
You have selected one project in the project view of RVC Cockpit app.
-
You have selected one requirement in the model view of RVC Cockpit app.
-
The requirement is in status in validation.
Procedure
-
Check the requirement details.
-
Confirm with Approve or Reject.
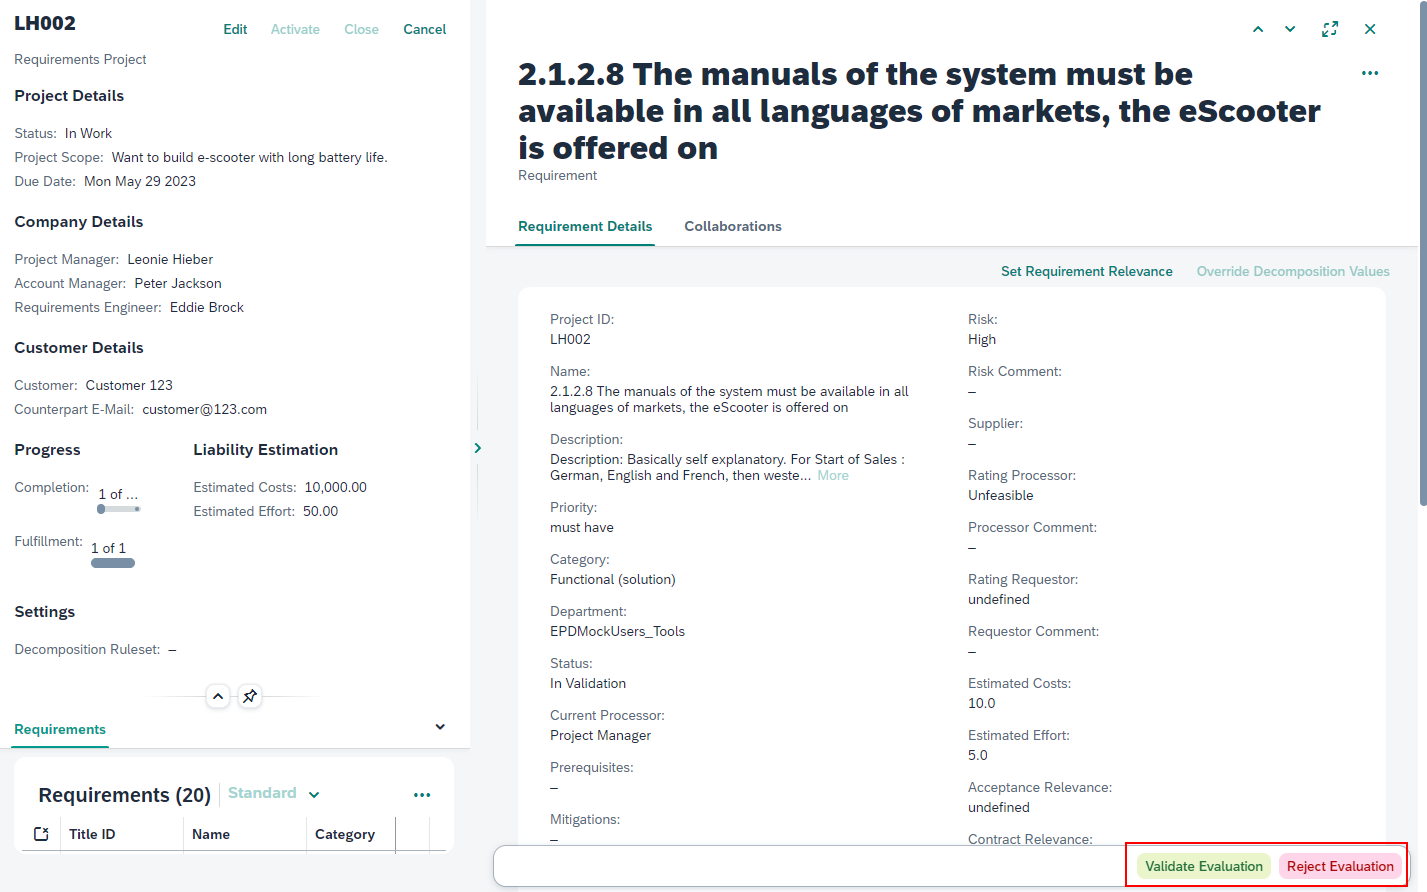 Illustration 26. RVC Cockpit app requirement view - approve or reject the evaluation
Result
| Action | Result | Next Status |
|---|---|---|
Approve |
The evaluation of the requirement is completed. |
validated |
Reject |
The evaluation of the requirement is incomplete, rework by the department is required |
in evaluation |
Next Steps
-
How to evaluate a requirement?
or alternatively:
1.4. How to use the collaboration view in RVC Cockpit as a supplier?
To evaluate requirements by the supplier the requirements are shared with the supplier using a collaboration. To be notified about this collaboration and to be able to access it, the supplier will receive an email with a link to the collaboration.
Prerequisites
-
Role RVCProcessorSupplier is assigned to your user.
-
You can access My Collaborations app from the SAP Fiori Launchpad.
-
At least one requirement is shared with you via a supplier collaboration.
Quick Steps
1.4.1. How to open RVC Evaluator for Supplier app?
This section describes the steps to open RVC Evaluator for Supplier app.
Prerequisites
Procedure
-
To open your collaboration in My Collaborations app.
-
Click on the link in the email.
or alternatively:
-
Open My Collaborations app from SAP Fiori Launchpad and select your collaboration.
NoteThe name of the collaboration is generated automatically according to the following pattern: <project-name>_<department>_<supplier>
-
-
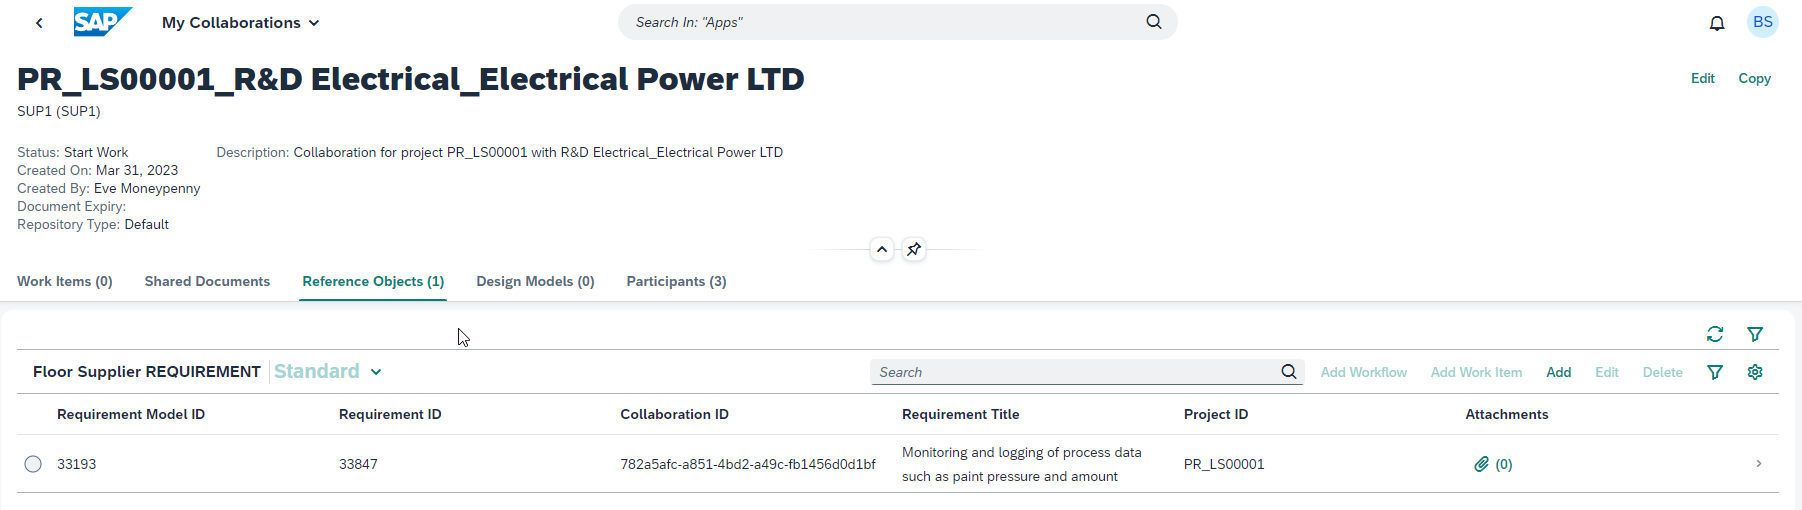
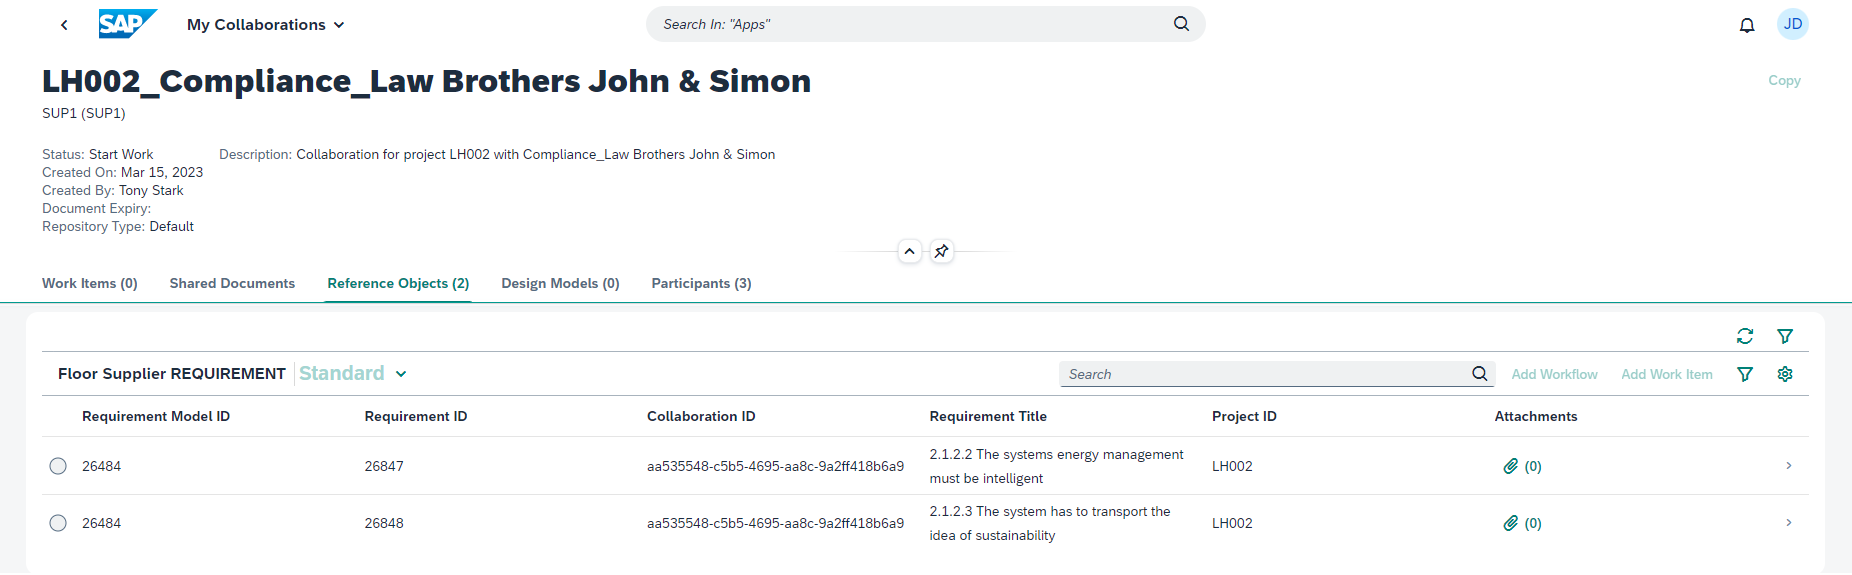
Change to Reference Objects section. Refer: My Collaborations - RVC supplier collaboration
-
Click on any requirement of type RVC Supplier REQUIREMENT to open RVC Evaluator for Supplier app in another card.
Result
RVC Evaluator for Supplier app lists the requirements assigned to the supplier.
Next Steps
1.4.2. How to share a requirement with the customer as a supplier?
This section describes the steps to be performed as a supplier to clarify a requirement through the customer.
Prerequisites
-
Role RVCProcessorSupplier is assigned to your user.
-
You can access My Collaborations app from the SAP Fiori Launchpad.
-
At least one requirement is shared with you via a supplier collaboration.
-
You have selected one requirement in RVC Evaluator for Supplier app.
Procedure
-
Click on Share and Clarify through Customer.
Result
The status will change to in clarification and the current processor is now the Customer. The customer will receive an information.
Next Steps
-
After the customer has clarified the requirement it will be returned to you.
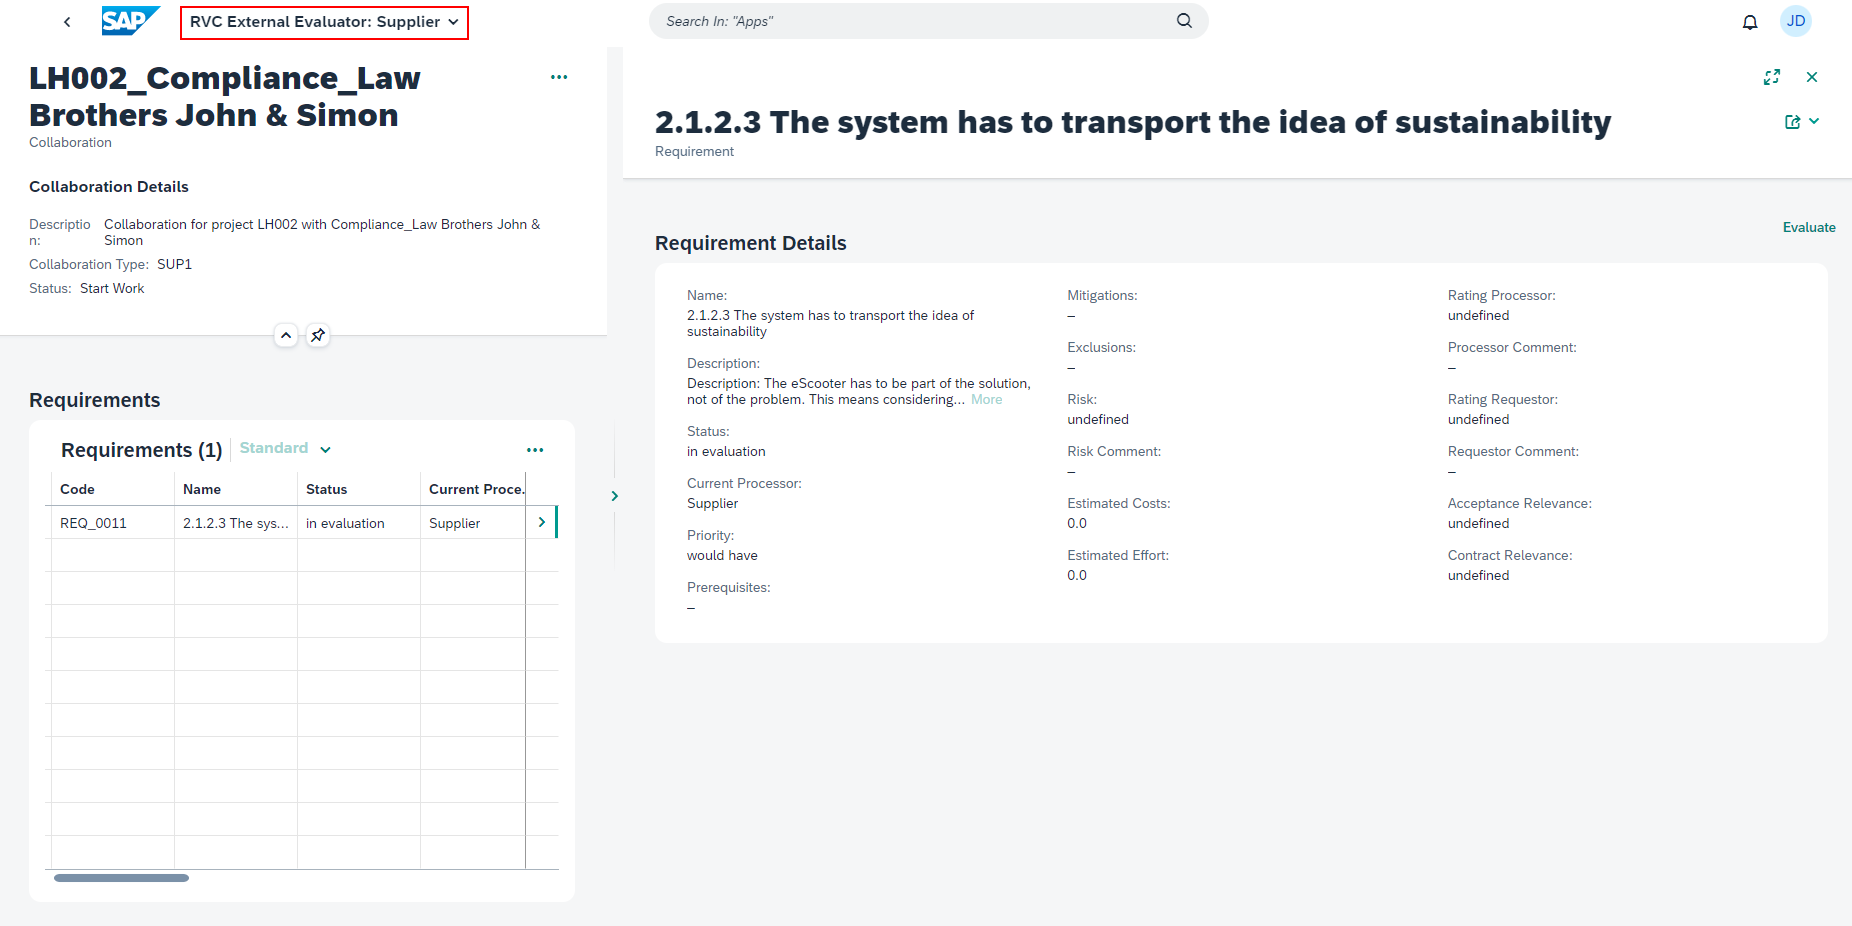
1.4.3. How to evaluate a requirement as a supplier?
This section describes the steps a supplier must perform to evaluate a requirement.
Prerequisites
-
Role RVCProcessorSupplier is assigned to your user.
-
You can access My Collaborations app from the SAP Fiori Launchpad.
-
At least one requirement is shared with you via a supplier collaboration.
-
You have selected one requirement in RVC Evaluator for Supplier app.
Procedure
-
Select the requirement.
-
Click the Evaluate button.
-
Evaluate the requirement with the help of the following table:
Rating Processor Description standard
The requirement can be implemented according to its description.
modification
The requirement is possible to implement with some restrictions and/or modification. In this case estimated costs and estimated effort should be filled out as well.
unfeasible
The requirement is not possible to implement. It is possible to discuss an alternative solution with the customer, which the customer can agree to. If the alternative solution is accepted by the customer the rating processor must be changed to either standard or modification depending on the solution. If the alternative solution is not accepted the rating processor remains on unfeasible.
-
According to the rating fill out the risk and the risk comment.
-
According to the rating fill out estimated costs and effort:
Illustration 29. RVC - evaluation of estimated costs and effortNoteConsider that units of currency and time are defined in the project properties.
-
According to the rating fill out prerequisites, exclusion and mitigation.
-
Click the Evaluate button.
Result
The values set in the evaluator are stored in the requirement.
Next Steps
1.4.4. How to submit the evaluation of a requirement as a supplier?
This section describes the steps to be performed as a supplier to submit the evaluation of a requirement.
Prerequisites
-
Role RVCProcessorSupplier is assigned to your user.
-
You can access My Collaborations app from the SAP Fiori Launchpad.
-
At least one requirement is shared with you via a supplier collaboration.
-
You have selected one requirement in RVC Evaluator for Supplier app.
-
The requirement is in status in evaluation and is evaluated.
Procedure
-
Check the requirement details.
-
Click on Submit Evaluation.
NoteDo not submit the evaluation before finishing with the work! If the evaluation of the requirement is submitted you can no longer work on the requirement.
Result
The status will be still in evaluation but the current processor is now the Department.
Next Steps
-
1.5. How to use the collaboration view in RVC Cockpit as a customer?
To clarify a requirement or to submit or reject an alternative solution for a requirement by the customer the requirements are shared with the customer using a collaboration. In both cases the customer will receive an email containing a link to the collaboration.
Prerequisites
-
Role RVCProcessorCustomer is assigned to your user.
-
You can access My Collaborations app from the SAP Fiori Launchpad.
-
At least one requirement is shared with you via a customer collaboration.
Quick Steps
1.5.1. How to open RVC Evaluator for Customer app?
This section describes the steps to open RVC Evaluator for Customer app.
Prerequisites
-
Role RVCProcessorCustomer is assigned to your user.
-
You can access My Collaborations app from the SAP Fiori Launchpad.
-
At least one requirement is shared with you via a customer collaboration.
Procedure
-
To open your collaboration in My Collaborations app:
-
Click on the link in the email.
or alternatively:
-
Open My Collaborations app from SAP Fiori Launchpad and select your collaboration.
NoteThe name of the collaboration is generated automatically according to the following pattern: <project-name>_<customer>
-
-
Change to Reference Objects section. Refer: My Collaborations - RVC customer collaboration
-
Click on any requirement of type RVC Customer REQUIREMENT to open RVC Evaluator for Customer app in another card.
Result
RVC Evaluator for Customer app lists the requirements assigned to the customer.
Next Steps
1.5.2. How to clarify a requirement as a customer?
This section describes the steps to be performed as a customer to clarify a requirement.
Prerequisites
-
Role RVCProcessorCustomer is assigned to your user.
-
You can access My Collaborations app from the SAP Fiori Launchpad.
-
At least one requirement is shared with you via a customer collaboration.
-
You have selected one requirement in RVC Evaluator for Customer app.
Procedure
-
Enter a comment.
-
Confirm with Clarification.
Result
The status changes to in evaluation and the value of the current processor corresponds to the user who shared the requirement with the customer.
Next Steps
-
1.5.3. How to approve or reject a requirement as a customer?
This section describes the steps to be performed as a customer to submit or reject an alternative solution for a requirement.
Prerequisites
-
Role RVCProcessorCustomer is assigned to your user.
-
You can access My Collaborations app from the SAP Fiori Launchpad.
-
At least one requirement is shared with you via a customer collaboration.
-
You have selected one requirement in RVC Evaluator for Customer app.
Procedure
-
Enter a comment.
-
Confirm with Approve or Reject.
Result
The status will stay in evaluation and the current processor is now the Department. The department will receive an information.
Next Steps
-
1.6. How to access the online documentation?
This section describes the steps to open the online documentation of this CENIT App.
Context
Accessing the online documentation of this CENIT App.
Prerequisites
-
You can open this CENIT App.
Procedure
-
Select the information icon at the top right of the table.
-
Select Documentation.
Result
The online documentation of this CENIT App is opened in a separate tab.
Next Steps
-
1.7. How to access the online Data Privacy Notice?
This section describes the steps to open the online Data Privacy Notice of this CENIT App.
Context
Accessing the online Data Privacy Notice of this CENIT App.
Prerequisites
-
You can open this CENIT App.
Procedure
-
Select the information icon at the top right of the table.
-
Select Data Privacy Notice.
Result
The online Data Privacy Notice of this CENIT App is opened in a separate tab.
Next Steps
-
1.8. How to get information about CENIT?
This section describes the steps to access imprint of CENIT.
Context
Get information about CENIT.
Prerequisites
-
You can open this CENIT App.
Procedure
-
Select the information icon at the top right of the table.
-
Select About CENIT.
Result
The imprint of CENIT is opened in a separate tab.
Next Steps
-
1.9. How to get support?
This section describes how you can get support from CENIT in case of an unexpected behavior occurs in this CENIT App.
Context
The get support the following questions have to be answered:
-
What is the issue?
-
What is the expected behavior?
-
What are the steps to reproduce the issue?
Prerequisites
-
You can open this CENIT App.
-
Your local email program is configured as the standard email program on your computer.
Procedure
-
Select the information icon at the top right of the table.
-
Select Get support.
-
Fill out the support questionnaire.
-
Submit your support request.
-
Send the created email.
Result
An email is created in your local email program containing the information from the questionnaire.
|
Note
|
The created email as well contains additional information about this CENIT App for automation of the ticket creation at CENIT. Please do not remove these additional information. |
Next Steps
-
1.10. How to give feedback?
This section describes how you can give feedback to CENIT about your user experience for this CENIT App.
Context
In order to provide evaluable feedback, we would like to ask you to answer the following questions:
-
What is the feedback about?
-
How satisfied you are with the application/software as a whole?
-
Does the application/software meet your requirements and is easy to use?
-
Which additional feedback do you have that could help us to improve your user experience with the application/software?
Prerequisites
-
You can open this CENIT App.
-
Your local email program is configured as the standard email program on your computer.
Procedure
-
Select the information icon at the top right of the table.
-
Select Give feedback.
-
Fill out the feedback questionnaire.
-
Submit your feedback.
-
Send the created email.
Result
An email is created in your local email program containing the information from the questionnaire.
|
Note
|
The created email as well contains additional information about this CENIT App for automation of the ticket creation at CENIT. Please do not remove these additional information. |
Next Steps
-
Glossary
CENIT on premises App
CENIT on premises App refers to applications/software created by CENIT which the licensee installs, operates, runs and uses under its own responsibility in its own environment.
CENIT cloud App
CENIT cloud App refers to applications/software created by CENIT that are provided, operated and executed on a cloud platform such as Amazon Web Service (AWS), Google Cloud Platform (GCP), Mircosoft Azure (MS Azure) or SAP Business Technology Platform (BTP) by CENIT and used by licensees.
CENIT mobile App
CENIT mobile App refers to applications/software created by CENIT that are installed, executed and used by the licensee on mobile operating systems such as iOS or Android on corresponding end devices.
CENIT App
CENIT App refers to CENIT on premises App, CENIT cloud App and CENIT mobile App.
SW Purchase Contract
The SW Purchase Contract is the contract agreed between the licensee and CENIT for the use of a specific CENIT on premises App in perpetuity.
Program certificate for permanent SW
The Program certificate for permanent SW is the document attached to the order confirmation by CENIT for a specific CENIT on premises App, which contains the licenses for this CENIT on premises App ordered in the SW Purchase Contract with the number and license start date.
SW Rental Contract
The SW Rental Contract is the contract agreed between the licensee and CENIT for the use of a specific CENIT App for a period of time.
Program certificate for temporary SW
The Program certificate for temporary SW is the document attached to the order confirmation by CENIT for a specific CENIT App, which contains the licenses for this CENIT App ordered in the SW Rental Contract with the number, license start date and minimum terms.
Program description
The program description is the description of the designated CENIT App contained in the Program certificate for permanent SW or the Program certificate for temporary SW.
Program documentation
The program documentation is the documentation of the CENIT App identified in the Program certificate for permanent SW or the Program certificate for temporary SW.
Hotline Service
Service of CENIT for the receipt of error messages for applications/software and elimination of the error message by simple bypass solution (first level support). If a simple workaround is not possible, the error message is forwarded to the support infrastructure of the respective manufacturer of the applications/software.
Support Service
Service of CENIT to resolve malfunctions that occur during the licensee’s contractual use of the applications/software (second level support).
Update Service
Service of CENIT to provide new program versions of the applications/software and associated program documentation to the licensee.
Provide
CENIT provides licensed CENIT on premises App, additional files for licensed CENIT App and program documentation for licensed CENIT App to licensees for download on the portal of CENIT or the portal of a contractor.
Install
The licensee copies the licensed CENIT on premises App or CENIT mobile App under its own responsibility into its own environment to configure, operate and use it.
Configure
The licensee configures the licensed CENIT App under its own responsibility in its own environment using the configuration options specified in the program documentation of the CENIT App. Configuration is understood to be both the initial configuration after installation of the CENIT App and the business configuration of the CENIT App for use by the users.
Customize
The licensee extends the licensed CENIT on premises App under its own responsibility in its own environment using exclusively the exits/extension interfaces listed in the program documentation of the CENIT on premises App.
Implement
Summarizes the installation, configuration and customization of a CENIT on premises App.
Deploy
CENIT deploys a CENIT cloud App on the respective cloud platform of CENIT for operation.
Operate
CENIT operates a CENIT cloud App provided on the respective cloud platform of CENIT by CENIT. CENIT is thus responsible for providing updates for this CENIT cloud App on the respective cloud platform of CENIT.
Run
A CENIT cloud App runs on the cloud platform of CENIT. Licensees can use the CENIT cloud App after subscribing to its cloud platform.
Offer
CENIT offers a CENIT App on the homepage of CENIT so that customers can order this CENIT App.
Buy
Customers enter into a SW Purchase Contract or SW Rental Contract with CENIT to get licenses for the use of a specific CENIT App.
Whitelisting
CENIT whitelists a licensees cloud platform to activate a specific CENIT cloud App on the licensee’s cloud platform so that the licensee can subscribe to this CENIT cloud App.
Subscribe
Licensees subscribe to a CENIT cloud App on their cloud platform to use it.
Usage
Licensee users who have subscribed to a CENIT cloud App or installed a CENIT on premises App or CENIT mobile App may use this CENIT App for their business purposes.