Purpose
|
|
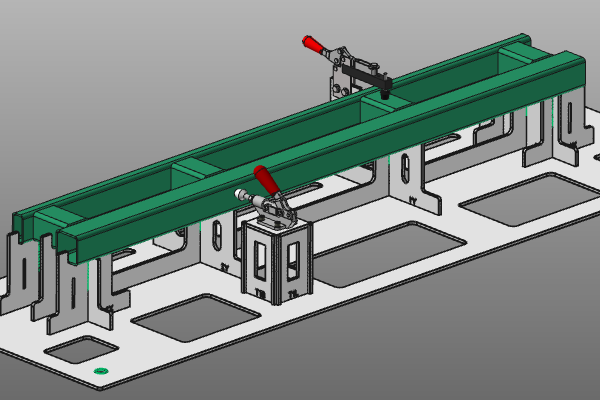
This page shows some examples to complete the fixture assembly with additional (library) components, such as clamps.
|
|

|
This page requires that the standard component library has been installed. See the Getting started page for more information about this library.
|
|
|

|
Load the project Fixture_Training_Assembly.cendoc from the folder of this tutorial library.
|
|
|
|
Steps
|
|
1
|
Clamp mounted on a tower
|
|
1.1
|

|
Open the Component library dashboard. Surf for the clamp you want to add to the fixture. Simply drag and drop the clamp into the 3D space or use the Add existing objects command from the pie menu.

|
1.2
|

|
Switch to the Drag & snap operation mode. Select the clamp. Use the Picking command on the manipulator's center to move the clamp to its wanted position at the workpiece part. When done, switch back to the Normal operation mode.

|
1.3
|

|
Now you can build a tower object on where the clamp will be mounted.
Attach the manipulator to the mechanical adapter of the clamp. If that one is not visible, open the Display filters and switch on the adapters display. When set, open the pie menu to start the Add tower command. In the parameter panel, make sure that the option With top plate is switched on. Finally, click in the 3D space to execute the creation.

|
1.4
|

|
Attach the manipulator to the center of the clamp screws. On each of them Create a hole in the tower top plate.
Because the clamp covers the holes, obviously, you can open the Product structure dashboard and temporarily hide the clamp to see the result so far.

|
|
|
2
|
Clamp mounted on support plate
|
|
2.1
|

|
Open the Component library dashboard. Surf for the clamp you want to add to the fixture. Simply drag and drop the clamp into the 3D space or use the Add existing objects command from the pie menu.

|
2.2
|

|
Switch to the Drag & snap operation mode. Select the clamp. Use the Picking command on the manipulator's center to move the clamp to its wanted position at the workpiece part and over a support plate. When done, switch back to the Normal operation mode.

|
2.3
|

|
Resize the flange of the support plate so that the clamp can be mounted on the plate.

|
2.4
|

|
Place the manipulator at the center of the clamp screws. On each of them Create a hole in the support plate.
Because the clamp covers the holes, obviously, you can open the Product structure dashboard and temporarily hide the clamp to see the result so far.

|
|
|